-
Tkinter > les boutons
GENERALITES
import tkinter
w = tk.Tk()
def mafonction():
    print("click!")

b = tk.Button(w, text="OK", command=mafonction)
b.pack()
w.mainloop()
MISE EN FORME
arrière-plan
activebackground=couleur du fond lorsque le bouton est enfoncébackground=oubg=couleur du fond.texte
font=Police utilisée >font=(‘calibri’, 10, ‘bold’, ‘underline’)foreground=oufg=Couleur du textedisabledforeground=Couleur du texte si le bouton est désactivéactiveforeground=What foreground color to use when the button is activetextvariable=Associe une variable Tkinter (StringVar) à un bouton. Si cette variable est modifiée, le texte du bouton est mis à jour.underline=Quel caractère est souligné (pour signalé un éventuel raccourci clavier). Par défaut,-1(pas de caractère)justify=Comment aligner le texte : LEFT - RIGHT - CENTER (par défaut)anchor=Où sera ancré le texte : N, NE, E, SE, S, SW, W, NW, ou CENTER (par défaut)bordures
borderwidth=oubd=Taille de la bordurerelief=Style de la bordure (SUNKEN when pressed et RAISED (par défaut). Other possible values are GROOVE, RIDGE, SOLID et FLAThighlightbackground=Couleur de la bordure quand le bouton does not have focushighlightcolor=Couleur de la bordure supplémentaire quand le bouton has focushighlightthickness=Taille de la bordure supplémentairepadx=etpady=espacement entre la bordure du bouton et celle de la fenêtre parente (en caractères si texte - en pixel si image)ipadx=etipady=( à placer dans le.grid()), espacement entre le texte (ou image) et la bordure du bouton.height=Hauteur. Si bouton-texte, valeur en caractères. Si bouton-image, valeur en pixels.width=Largeur.COMMANDES
Fermer la fenêtre active
b = Button(w, text='Quitter', command=root.destroy)Aucune commande
b = Button(w, text='Rien', command=None)IMAGE DANS UN BOUTON
Dans Button, tu as des options comme command, anchor, etc. Eh bien tu as aussi une option image Un truc du genre :
from tkinter import *
w = Tk()
photo = PhotoImage(file='bonhomme.gif')
button = Button(w, image=photo)
button.pack()
Label(w, text="toto").pack()
w.mainloop()
En créant un canvas :
from Tkinter import *
root = Tk()
image = PhotoImage(file='toto.gif')
canvas = Canvas(root, width=1, height=1)
canvas.pack(fill=BOTH, expand=1)
canvas.create_image(0, 0, image=image, anchor=NW)
canvas.create_text(0, 20, text='bonhomme', anchor=W)
root.geometry('70x70')
root.mainloop()
Merci fred, mais un canvas n’est pas cliquable, or je voudrai que ce texte et cette image soit sur un bouton…
et la methode bind?
from Tkinter import *
import os
def create():
    global w, image
    canvas = Canvas(w, width=1, height=1)
    canvas.create_image(5, 5, image=image, anchor=NW)
    canvas.create_text(15, 10, text='bonhomme', anchor=W)
    canvas.pack(fill=BOTH, expand=1)
    canvas.bind("<Button-1>",callback)
def callback(event):
    os.system('clear')
w = Tk()
w.geometry("400x400")
image = PhotoImage(file='toto.gif')
create()
w.mainloop()
pour met une image en fond d’écran. j’aurais besoin de mettre des boutons sur cette images. J’ai donc utiliser le code ci desous :
from Tkinter import *
import os
def create():
    global root, image
    canvas = Canvas(root, width=1, height=1)
    canvas.create_image(5, 5, image=image, anchor=NW)
    canvas.create_text(15, 10, text='bonhomme', anchor=W)
    canvas.pack(fill=BOTH, expand=1)
    canvas.bind("<Button-1>",callback)
def callback(event):
    os.system('clear')
root = Tk()
root.geometry("400x400")
image = PhotoImage(file='chemin/toto.gif')
create()
root.mainloop()
Image on a button
I expect the same output for both of the scripts below. But I don’t get the image on the button when I execute Script 1. However, Script 2 works well.
Script 1 :
from Tkinter import *
  class fe:
    def __init__(self,master):
      self.b=Button(master,justify = LEFT)
      photo=PhotoImage(file="mine32.gif")
      self.b.config(image=photo,width="10",height="10")
      self.b.pack(side=LEFT)
w = Tk()
front_end=fe(w)
w.mainloop()
Script 2 :
from Tkinter import *
w = Tk()
b = Button(w, justify=LEFT)
photo = PhotoImage(file="mine32.gif")
b.config(image=photo, width="10", height="10")
b.pack(side=LEFT)
w.mainloop()
The only reference to the image object is a local variable. When __init__ exits, the local variable is garbage collected so the image no is destroyed. In the second example, because the image is created at the global level it never goes out of scope and is therefore never garbage collected.
To work around this, save a reference to the image. For example, instead of photo use self.photo
its work
x1=Button(root)
photo=PhotoImage(file="Re.png")
x1.config(image=photo,width="40",height="40",activebackground="black", bg="black", bd=0,command=sil)
x1.place(relx=1,x=5, y=-5, anchor=NE)
but this is useless
def r():
    x1=Button(root)
    photo=PhotoImage(file="Re.png")
    x1.config(image=photo,width="40",height="40",activebackground="black", bg="black", bd=0,command=sil)
    x1.place(relx=1,x=5, y=-5, anchor=NE)
r()
logo = PhotoImage(file='mine32.gif') small_logo = logo.subsample(5, 5) self.b.config(image=small_logo , compound=LEFT )
You can put an image and text on a Tkinter button widget. This small code shows you how. The GIF image file you want to use for the button should be in the working directory, or you have to give it the full path. Incorporate the Python Image Library (PIL) for other image formats.
buttondirectory image python
# create a Tkinter button with an image and optional text note that Tkinter reads only GIF and PGM/PPM images
# for other image file types use the Python Image Library (PIL)
# replace the line photo1 = tk.PhotoImage(file="Press1.gif") with these three lines ...
#
# from PIL import Image, ImageTk
# image1 = Image.open("Press1.jpg")
# photo1 = ImageTk.PhotoImage(image1)
import Tkinter as tk
button_flag = True
def click():
    """
    respond to the button click
    """
    global button_flag
    # toggle button colors as a test
    if button_flag:
        button1.config(bg="white")
        button_flag = False
    else:
        button1.config(bg="green")
        button_flag = True

root = tk.Tk()
# create a frame and pack it
f1 = tk.Frame(root)
f1.pack(side=tk.TOP, fill=tk.X)
# pick a (small) image file you have in the working directory ...
photo1 = tk.PhotoImage(file="chemin/fichier.gif")
# create the image button, image is above (top) the optional text
b1 = tk.Button(f1, compound=tk.TOP, width=155, height=55, image=photo1, text="blabla", bg='green', command=click)
b1.pack(side=tk.LEFT, padx=2, pady=2)
# save the button's image from garbage collection (needed?)
b1.image = photo1
# start the event loop
root.mainloop()
IMAGE DANS LE BOUTON
If you want an image button, use the PhotoImage class. We set the size of the window and the miminum size with the functions minsize() and geometry(). Example:
from Tkinter import *
master = Tk()

def callback():
    print "click!"

photo=PhotoImage(file="add.png")
b = Button(master,image=photo, command=callback, height=50, width=150)
b.pack()
mainloop()
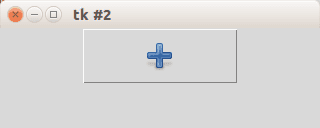
image + texte
ajouter le paramètre compound=LEFT
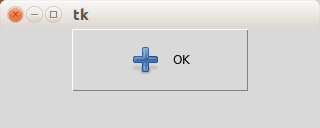
from Tkinter import *
master = Tk()

def callback():
    print "click!"

photo=PhotoImage(file="add.png")
b = Button(master,image=photo, text="OK", command=callback, height=50, width=150, compound=LEFT)
b.pack()

mainloop()
Button location
to place the button on your coordinates do not use the pack() function but instead use the function place(x,y), as shown in the example below:
from Tkinter import *
master = Tk()

def callback():
    print "click!"

photo=PhotoImage(file="add.png")
b = Button(master,image=photo, text="OK", command=callback, height=50, width=150, compound=LEFT)
b.place(x=20, y=20)

mainloop()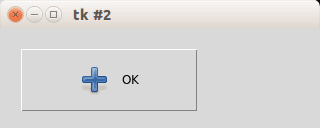
7 thoughts on “Tk window and button”
def callback():
  print ("click!")
  b = Button(root, text="OK", command=callback, height=25, width=25)
b.place(x=20, y=20)

Set the size with:
b.geometry("25x25")
when i import the wx and Tkinter, neither is working. I get an import error message and it says that there is no module named wx or Tkinter. Do i have to download these modules or what should i do? Am using python 3.4.3 on win 8.1. Thanks.
Hi, you should install either of these two modules. You could use pip or easyinstall for that.
PhotoImage function doesn’t open ‘png’ files.
It can be open ‘GIF, PGM and PPM’.
follow this article : http://stackoverflow.com/questions/27599311/tkinter-photoimage-doesnt-not-support-png-image
Thanks for the comment! This interesting. PhotoImage function opens PNG under Linux. Traditional formats are GIF, PGM and PPM, perhaps the Linux version of the Tk package is custom or you have an old Tkinter version. Do you have the latest Tkinter version?
The developers of Tk mention: “Built-in PNG Image Support: Photo images now support read/write in the PNG format, with the ability to set the alpha channel.” http://www.tcl.tk/software/tcltk/8.6.html
I’ll have a look when I’m on a windows machine.
import ImageTk
…
photo=ImageTk.PhotoImage(file=”add.png”)—
The Tkinter Button Widget
In that case, it is probably a good idea to disable the button to avoid confusing your beta testers:
b = Button(master, text="Help", state=DISABLED)
You can specify the size in pixels even for text buttons, but that requires some magic :
f = Frame(master, height=32, width=32)
f.pack_propagate(0) # don't shrink
f.pack()
b = Button(f, text="Sure!")
b.pack(fill=BOTH, expand=1)
Pour sauter une ligne dans le bouton : can use newlines, or use the wraplength option to make the button wrap text by itself. When wrapping text, use the anchor, justify, and possibly padx options to make things look exactly as you wish :
a = Button(master, texte="OK\nCOOL")
b = Button(master, text=longtext, anchor=W, justify=LEFT, padx=2)
Pour le background : Préférer la solution avec Checkbutton ou Radiobutton with the indicatoron option set to false:
b = Checkbutton(master, image=bold, variable=var, indicatoron=0)
In earlier versions of Tkinter, the image option overrides the text option. If you specify both, only the image is displayed. In later versions, you can use the compound option to change this behavior. To display text on top of an image, set compound to CENTER:
b = Button(master, text="Click me", image=pattern, compound=CENTER)
Pour afficher une icone avec le texte :
# placer l'icone à gauche du texte
b = Button(compound=LEFT, image=icon, text="Action")
# placer l'icone au dessu du texte
b = Button(compound=TOP, image=icon, text="Quit")
OPTIONS
Button(fenetreParent, options)
bitmap=The bitmap to display in the widget. If the image option is given, this option is ignoredcommand=A function or method that is called when the button is pressed. The callback can be a function, bound method, or any other callable Python object. If this option is not used, nothing will happen when the user presses the button.compound=Controls how to combine text and image in the button. By default, if an image or bitmap is given, it is drawn instead of the text. If this option is set to CENTER, the text is drawn on top of the image. If this option is set to one of BOTTOM, LEFT, RIGHT, or TOP, the image is drawn besides the text (use BOTTOM to draw the image under the text, etc.). Default is NONE.cursor=The cursor to show when the mouse is moved over the button.default=si renseigné, alors le bouton devient celui par défaut (pré-cliqué).image=The image to display in the widget. If specified, this takes precedence over the text and bitmap options.overrelief=Alternative relief to use when the mouse is moved over the widget. If empty, always use the relief value.repeatdelay=
repeatinterval=
state= The button state: NORMAL, ACTIVE or DISABLED. Default is NORMAL.takefocus= Indicates that the user can use the Tab key to move to this button. Default is an empty string, which means that the button accepts focus only if it has any keyboard bindings (default is on, in other words).width= Largeur du bouton. Si bouton-texte, la taille sera en caractères. Si bouton-image, la taille sera en pixels.wraplength= Determines when a button’s text should be wrapped into multiple lines. This is given in screen units. Default is 0 (no wrapping).flash()Flash the button. This method redraws the button several times, alternating between active and normal appearance.
invoke()Call the command associated with the button.Image Button
from tkinter import *
w = Tk()
img = PhotoImage(file="image.png")
b = Button(w, image=img, width=100, height=100)
b.grid(row=2,column=2)
w.mainloop()

Quitter et fermer la fenêtre
command=quit
IMAGE
First create an image.png and remove the outside background so it is rounded like the one below, puis insert the image in a button with PhotoImage :
self.loadimage = tk.PhotoImage(file="rounded_button.png")
self.roundedbutton = tk.Button(self, image=self.loadimage)
self.roundedbutton["bg"] = "white"
self.roundedbutton["border"] = "0"
self.roundedbutton.pack(side="top")
border="0″ and the button border will be removed.
I added the self.roundedborder["bg"] = "white" so that the background of the button is the same as the Tkinter window.
Add image on a Tkinter button
Image can be added with the help of PhotoImage() method.
NOTE: If both image and text are given on Button, the text will be dominated and only image will appear on the Button. But if you want to show both image and text then you have to pass compound in button options.
Button(master, text="Button", image="image.png", compound=LEFT)
LEFT : image à gauche du bouton - RIGHT -> image will be at right side of button - TOP -> image will be at top of button - BOTTOM -> image will be at bottom of button
photo = PhotoImage(file="chemin/fichier")Code :
from tkinter import *
from tkinter.ttk import *
# creating tkinter window
root = Tk()
# Adding widgets to the root window
Label(root, text='GeeksforGeeks', font=('Verdana', 15)).pack(side=TOP, pady=10)
# Creating a photoimage object to use image
photo = PhotoImage(file=r"C:\Gfg\circle.png")
# here, image option is used to set image on button
Button(root, text='Click Me !', image=photo).pack(side=TOP)
mainloop()

Seule l’image est visible, et elle est plus large que le bouton.IMAGE + TEXTE
from tkinter import *
from tkinter.ttk import *
# creating tkinter window
root = Tk()
# Adding widgets to the root window
Label(root, text='GeeksforGeeks', font=('Verdana', 15)).pack(side=TOP, pady=10)
# Creating a photoimage object to use image
photo = PhotoImage(file=r"/chemin/image.png")
# Resizing image to fit on button
photoimage = photo.subsample(3, 3)
# here, image option is used to set image on button compound option is used to align image on LEFT side of button
Button(root, text='Click Me !', image=photoimage, compound=LEFT).pack(side=TOP)
mainloop()

hover
from tkinter import *
from tkinter.ttk import *
root = Tk()
style = Style()
style.configure('TButton', font=('calibri', 20, 'bold'), borderwidth = '4')
# Changes will be reflected by the movement of mouse.
style.map('TButton', foreground=[('active', '! disabled', 'green')], background=[('active', 'black')])
# button 1

btn2.grid(row=1, column=3, pady=10, padx=100)
root.mainloop()
—
Place()
Place() permet de position de façon précise un widget par rapport à son parent (au pixel prés).
Centrer un widget dans son parent :
w.place(relx=0.5, rely=0.5, anchor=CENTER)
pack a Label in a frame, and then places a Button in the upper right corner of the frame. The button will overlap the label.
pane = Frame(master)
Label(pane, text="Pane Title").pack()
b = Button(pane, width=12, height=12, image=launch_icon, command=self.launch)
b.place(relx=1, x=-2, y=2, anchor=NE)
The following excerpt from a Notepad widget implementation displays a notepad page (implemented as a Frame) in the notepad body frame. It first loops over the available pages, calling place_forget for each one of them. Note that it’s not an error to “unplace” a widget that it’s not placed in the first case:
for w in self.__pages:
    w.place_forget()
self.__pages[index].place(in_=self.__body, x=bd, y=bd)
You can combine the absolute and relative options. In such cases, the relative option is applied first, and the absolute value is then added to that position. In the following example, the widget w is almost completely covers its parent, except for a 5 pixel border around the widget.
w.place(x=5, y=5, relwidth=1, relheight=1, width=-10, height=-10)
You can also place a widget outside another widget. For example, why not place two widgets on top of each other:
w2.place(in_=w1, relx=0.5, y=-2, anchor=S, bordermode="outside")
Note the use of relx and anchor options to center the widgets vertically. You could also use (relx=0, anchor=SW) to get left alignment, or (relx=1, anchor=SE) to get right alignment.
By the way, why not combine this way to use the packer with the launch button example shown earlier. The following example places two buttons in the upper right corner of the pane:
b1 = DrawnButton(pane, (12, 12), launch_icon, command=self.launch)
b1.place(relx=1, x=-2, y=2, anchor=NE)
b2 = DrawnButton(pane, (12, 12), info_icon, command=self.info)
b2.place(in_=b1, x=-2, anchor=NE, bordermode="outside")
Finally, let’s look at a piece of code from an imaginary SplitWindow container widget. The following piece of code splits frame into two subframes called f1 and f2.
f1 = Frame(frame, bd=1, relief=SUNKEN)
f2 = Frame(frame, bd=1, relief=SUNKEN)
split = 0.5
f1.place(rely=0, relheight=split, relwidth=1)
f2.place(rely=split, relheight=1.0-split, relwidth=1)
To change the split point, set split to something suitable, and call the place method again. If you haven’t changed an option, you don’t have to specify it again.
f1.place(relheight=split)
f2.place(rely=split, relheight=1.0-split)
You could add a small frame to use as a dragging handle, and add suitable bindings to it, e.g:
f3 = Frame(frame, bd=2, relief=RAISED, width=8, height=8)
f3.place(relx=0.9, rely=split, anchor=E)
f3.bind("B1-Motion>", self.adjust)
place(options) Place this widget relative to its parent.
anchor= Default is NW.
bordermode= Default is INSIDE.
height= No default value.
in= Default is ..
relheight= No default value.
relwidth= No default value.
relx= Default is 0.
rely= Default is 0.
width= No default value.
x= Default is 0.
y= Default is 0
place_forget() The place_forget method.
place_info() The place_info method.
place_slaves() The place_slaves method.
slaves() Same as place_slaves.
—