-
PYTHON > pyqt5
- Widgets
- Layout managers
- Dialogs
- Main windows
- Applications
- Event loops
- Signals and slots
- You’ll have to do a lot of manual calculations to determine the correct size and position of every single widget in your forms.
- You’ll have to do some extra calculations to correctly respond to changes in form size (resize event).
- You’ll have to redo all the calculations whenever you change the layout of your forms or add or remove widgets.
- Line 15 creates a QHBoxLayout object called layout.
- Lines 16 to 18 add three buttons to layout with .addWidget()
- Line 19 sets layout as your window’s layout with .setLayout().
- A Main Window-Style application: The application’s main window inherits from QMainWindow.
- A Dialog-Style application: The application’s main window inherits from QDialog.
- Modal dialogs: block input to any other visible windows in the same application. You can display a modal dialog by calling .exec_().
- Modeless dialogs: operate independently of other windows in the same application. You can display a modeless dialog by using .show().
- Line 14 creates a full class Dialog for the GUI, which inherits from QDialog.
- Line 20 assigns a QVBoxLayout object to dlgLaout.
- Line 21 assigns a QVFormLayout object to formLayout.
- Line 22 to 25 add widgets to formLayout.
- Line 26 uses dlgLayout to arrange all the widgets on the form.
- Line 27 provides a convenient object to place the dialog buttons.
- Lines 28 and 29 add two standard buttons: Ok and Cancel.
- Lines 33 to 37 wrap the boilerplate code in an if __name__ == ‘__main__’: idiom. This is considered a best practice for Pythonistas.
- One menu bar is at the top of the window. The menu bar holds the application’s main menu.
- Several toolbars are on the sides of the window. Toolbars are suitable for holding tool buttons and other kinds of widgets such as QComboBox, QSpinBox, and more.
- One central widget is in the center of the window. The central widget can be of any type, or it can be a composite widget.
- Several dock widgets are around the central widget. Dock widgets are small, movable windows.
- One status bar is at the bottom of the window. The status bar shows information on the application’s general status.
- Line 13 creates a class Window that inherits from QMainWindow.
- Line 18 sets the window’s title.
- Line 19 sets a QLabel as the central widget.
- Lines 20 to 22 call private methods in the lines that follow in order to create different GUI elements:
- Lines 24 to 26 create the main menu.
- Lines 28 to 31 create the toolbar.
- Lines 33 to 36 create the status bar.
- One main menu called Menu
- One toolbar with a functional Exit tool button
- One central widget (a QLabel object)
- One status bar at the bottom of the window
- Handling initialization and finalization
- Providing the event loop and event handling
- Handling most of the system-wide and application-wide settings
- Providing access to global information, such as the application’s directory, screen size, and so on
- Parsing common command-line arguments
- Defining the application’s look and feel
- Providing localization capabilities
- .exec_()
- .exec()
- A signal can be connected to one or many slots.
- A signal may also be connected to another signal.
- A slot may be connected to one or many signals.
- The model takes care of your app’s business logic. It contains the core functionality and data. For your calculator, the model will handle the calculations.
- The view implements your app’s GUI. It hosts all the widgets the end-user would need to interact with the application. The view also receives user actions and events. For your calculator, the view will be the window you’ll see on your screen.
- The controller connects the model and the view to make the application work. User events (or requests) are sent to the controller, which puts the model to work. When the model delivers the requested result (or data) in the right format, the controller forwards it to the view. For your calculator, the controller will receive user events from the GUI, ask the model to perform calculations, and update the GUI with the result.
- The user performs an action or request (event) on the view (GUI).
- The view notifies the controller about the user’s action.
- The controller gets the user’s request and queries the model for a response.
- The model processes the controller query, performs the required operations, and returns an answer or result.
- The controller receives the model’s answer and updates the view accordingly.
- The user finally sees the requested result on the view.
- Lines 10 to 12 import the required modules and classes from PyQt5.QtWidgets.
- Line 18 creates the GUI with the class PyCalcUi. Note that this class inherits from QMainWindow.
- Line 24 sets the window’s title to PyCalc.
- Line 25 uses .setFixedSize() to give the window a fixed size. This ensures that the user won’t be able to resize the window.
- Line 27 creates a QWidget object to play the role of a central widget. Remember that since your GUI class inherits from QMainWindow, you need a central widget. This object will be the parent for the rest of the GUI component.
- Line 31 defines your calculator’s main function, which is considered a best practice. This function will be the entry point to the application. Inside main(), your program does the following:
- Line 34 creates a QApplication object pycalc.
- Line 37 shows the GUI with view.show().
- Line 39 runs the application’s event loop with pycalc.exec_().
- The display has a fixed height of 35 pixels.
- The display shows the text as left-aligned.
- The display is set to read-only to avoid direct editing.
- .setDisplayText() to set and update the display’s text
- .displayText() to get the current display’s text
- .clearDisplay() to clear the display’s text
- .setDisplayText() uses .setText() to set and update the display’s text, and .setFocus() to set the cursor’s focus on the display.
- .displayText() is a getter method that returns the display’s current text. When the user clicks on the equals sign (=), the program will use the return value of .displayText() as the math expression to be evaluated.
- .clearDisplay() sets the display’s text to an empty string (‘’) so the user can introduce a new math expression.
- Access the GUI’s public interface
- Handle the creation of math expressions
- Connect button clicked signals with the appropriate slots
- The try…except block doesn’t catch any specific exception, which is not a best practice in Python.
- The function is based on the use of eval(), which can lead to some serious security issues. The general advice is to only use eval() on trusted input.
- The Qt Designer
- The set of internationalization tools
- The PyQt5 resource system
- Create Graphical User Interfaces with Python and PyQt
- Connect user events to concrete actions in your application
- Create fully-functional GUI desktop applications to solve real-world problems
- PyQt5 Documentation
- PyQt4 Documentation
- Qt v5 Documentation
- PyQt Wiki
- Rapid GUI Programming with Python and Qt
- Qt Designer Manual
- Qt for Python (PySide2) documentation
Learning the Basics of PyQt
Widgets
QWidget is the base class for all user interface objects, or widgets. These are rectangular-shaped graphical components that you can place on your application’s windows to build the GUI. Widgets contain a series of attributes and methods that allow you to model their appearance and behavior. They can also paint a representation of themselves on the screen.
Widgets also receive mouse clicks, keypresses, and other events from the user, the window system, and many other sources. Each time a widget catches an event, it emits a signal to announce its state change. PyQt5 has a rich and modern collection of widgets that serve several purposes. Some of the most common and useful widgets are: Buttons - Labels - Line edits - Combo boxes - Radio buttons
button by instantiating QPushButton, a class that provides a classical command button. Typical buttons are OK, Cancel, Apply, Yes, No, et Close:
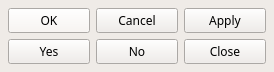
Buttons like these are perhaps the most commonly used widget in any GUI. When you click them, you can command the computer to perform actions. You can even perform actions in response to a user clicking a button.
labels, which you can create with QLabel. Labels give you a way to display useful information in the form of text or images:

You can use labels like these to better explain the purpose or usage of your GUI. You can tweak their appearance in several ways, and they can even accept HTML text, as you saw earlier. Labels can also be used to specify a focus mnemonic key for another widget.
line edit : QLineEdit. the user enter or edit data in plain text format :
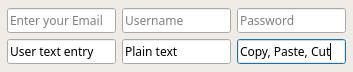
Line edits like these provide basic editing operations like copy, paste, undo, redo, drag, drop, and so on. On pleut aussi placer des placeholder pour inform the user what kind of input is required.
Combo boxes : QComboBox. A combo box will present your user with a list of options in a way that takes up a minimal amount of screen space. Here’s an example of a dropdown list on a Linux system:
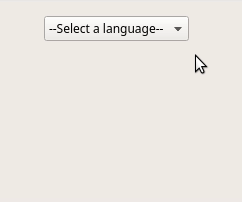
This combo box is read-only, which means the user can select one of several options but can’t add their own. Combo boxes can also be editable, allowing the user to add new options. They can contain pixmaps, strings, or both.
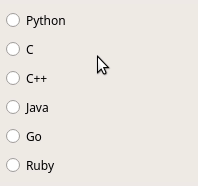
radio button,with QRadioButton:
Layout Managers
For instance, you can use .resize() and .move() to give widgets absolute sizes and positions. However, this can have some drawbacks:
One alternative is to use .resizeEvent() to calculate widget size and position dynamically. However, the most effective alternative is might be to use layout managers, which will both increase your productivity and improve your code’s maintainability.
Layout managers are classes that allow you to size and position your widgets at the places you want them to be on the application’s form. Layout managers automatically adapt to resize events and content changes. They also control the size of the widgets within them. This means that the widgets in a layout are automatically resized whenever the form is resized.
Note: If you develop international applications, then you may have seen how translated labels can be cut short. This is particularly likely when the target language is more verbose than the original language. Layout managers can help you avoid this common pitfall. However, this feature can be a bit tricky and can sometimes fail with particularly wordy languages.
PyQt provides four basic layout manager classes:
The first layout manager class is QHBoxLayout, which arranges widgets horizontally from left to right:
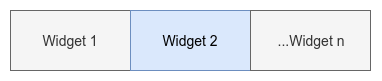
The widgets will appear one next to the other, starting from the left.
This code example shows you how to use QHBoxLayout to arrange buttons horizontally:
# Filename: h_layout.py
"""Horizontal layout example."""
import sys
from PyQt5.QtWidgets import QApplication
from PyQt5.QtWidgets import QHBoxLayout
from PyQt5.QtWidgets import QPushButton
from PyQt5.QtWidgets import QWidget
app = QApplication(sys.argv)
window = QWidget()
window.setWindowTitle('QHBoxLayout')
layout = QHBoxLayout()
layout.addWidget(QPushButton('Left'))
layout.addWidget(QPushButton('Center'))
layout.addWidget(QPushButton('Right'))
window.setLayout(layout)
window.show()
sys.exit(app.exec_())
The highlighted lines do the magic here:
When you run python3 h_layout.py from your command line, you’ll get the following output:
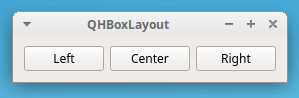
In the above figure, you added three buttons in a horizontal arrangement. Notice that the buttons are shown from left to right in the same order as you added them in your code.
The next layout manager class is QVBoxLayout, which arranges widgets vertically, from top to bottom:
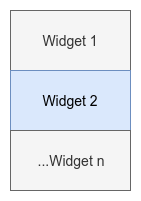
Each new widget will appear beneath the previous one. You can use this class to construct vertical box layout objects and organize your widget from top to bottom.
Here’s how you can create and use a QVBoxLayout object:
# Filename: v_layout.py
"""Vertical layout example."""
import sys
from PyQt5.QtWidgets import QApplication
from PyQt5.QtWidgets import QPushButton
from PyQt5.QtWidgets import QVBoxLayout
from PyQt5.QtWidgets import QWidget
app = QApplication(sys.argv)
window = QWidget()
window.setWindowTitle('QVBoxLayout')
layout = QVBoxLayout()
layout.addWidget(QPushButton('Top'))
layout.addWidget(QPushButton('Center'))
layout.addWidget(QPushButton('Bottom'))
window.setLayout(layout)
window.show()
sys.exit(app.exec_())
In line 15, you create an instance of QVBoxLayout. In the next three lines, you add three buttons to layout. Finally, you use layout to arrange the widget in a vertical layout.
When you run this application, you’ll get an output like this:
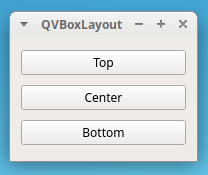
This application shows three buttons in a vertical layout, one below the other. The buttons appear in the same order as you added them in your code, from top to bottom.
The third layout manager class is QGridLayout, which arranges widgets into a grid of rows and columns. Every widget will have a relative position on the grid. You can define a widget’s position by passing it a pair of coordinates in the form of (row, column). These coordinates should be valid int numbers. They define which cell of the grid you’re going to place the widget on. The grid layout works as follows:
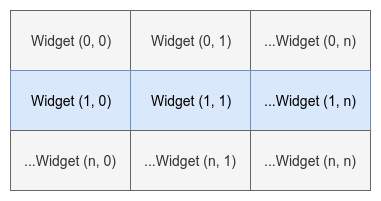
QGridLayout takes the space made available to it by its parent, divides it up into rows and columns, and puts each widget into its own cell.
Here’s how to use QGridLayout in your GUI:
# Filename: g_layout.py
"""Grid layout example."""
import sys
from PyQt5.QtWidgets import QApplication
from PyQt5.QtWidgets import QGridLayout
from PyQt5.QtWidgets import QPushButton
from PyQt5.QtWidgets import QWidget
app = QApplication(sys.argv)
window = QWidget()
window.setWindowTitle('QGridLayout')
layout = QGridLayout()
layout.addWidget(QPushButton('Button (0, 0)'), 0, 0)
layout.addWidget(QPushButton('Button (0, 1)'), 0, 1)
layout.addWidget(QPushButton('Button (0, 2)'), 0, 2)
layout.addWidget(QPushButton('Button (1, 0)'), 1, 0)
layout.addWidget(QPushButton('Button (1, 1)'), 1, 1)
layout.addWidget(QPushButton('Button (1, 2)'), 1, 2)
layout.addWidget(QPushButton('Button (2, 0)'), 2, 0)
layout.addWidget(QPushButton('Button (2, 1) + 2 Columns Span'), 2, 1, 1, 2)
window.setLayout(layout)
window.show()
sys.exit(app.exec_())
In this example, you create an application that uses a QGridLayout object to organize its widgets. Notice that, in this case, the second and third arguments you pass to .addWidget() are int arguments that define the position of each widget.
In line 23, you add two more arguments to .addWidget(). These arguments are called rowSpan and columnSpan, and they’re the fourth and fifth arguments passed to the function. You can use them to make a widget occupy more than one row or column like you did with QPushButton(‘Button (2, 1) + 2 Columns Span’) here.
If you run this code from your command line, then you’ll get a window like this:
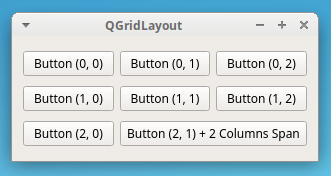
You can see your widgets arranged in a grid of rows and columns. The last widget occupies more than one cell, as you specified in line 23.
The last layout manager class is QFormLayout, which arranges widgets in a two-column layout. The first column usually displays messages in labels. The second column generally contains widgets like QLineEdit, QComboBox, QSpinBox, and so on. These allow the user to enter or edit data regarding the information in the first column. The following diagram shows how form layouts work in practice:
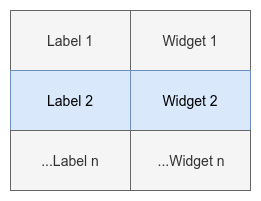
The left column consists of labels, and the right column consists of field widgets. If you’re dealing with a database application, then this kind of layout can be an attractive option for increased productivity when you’re creating your forms.
The following example shows you how to create an application that uses a QFormLayout object to arrange its widgets:
# Filename: f_layout.py
"""Form layout example."""
import sys
from PyQt5.QtWidgets import QApplication
from PyQt5.QtWidgets import QFormLayout
from PyQt5.QtWidgets import QLineEdit
from PyQt5.QtWidgets import QWidget
app = QApplication(sys.argv)
window = QWidget()
window.setWindowTitle('QFormLayout')
layout = QFormLayout()
layout.addRow('Name:', QLineEdit())
layout.addRow('Age:', QLineEdit())
layout.addRow('Job:', QLineEdit())
layout.addRow('Hobbies:', QLineEdit())
window.setLayout(layout)
window.show()
sys.exit(app.exec_())
Lines 15 to 20 do the hard work in this example. Notice that QFormLayout has a convenient method called .addRow(). You can use this method to add a two-widget row to the layout. The first argument of .addRow() should be a label, and the second argument should be any other widget that allows the user to enter or edit data.
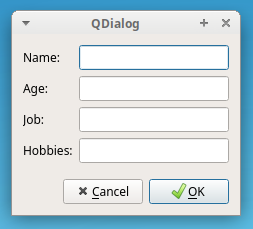
If you run this code, then you’ll get the following output:
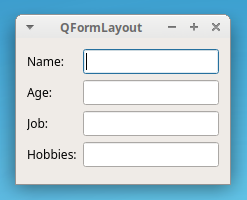
The above figure shows a GUI that uses a form layout. The first column contains labels to ask the user for some information. The second column shows widgets that allow the user to enter or edit the information you asked from them.
Dialogs
With PyQt, you can develop two types of GUI desktop applications. Depending on the class you use to create the main form or window, you’ll have one of the following:
You’ll start with Dialog-Style applications first. In the next section, you’ll cover Main Window-Style applications.
To develop a Dialog-Style application, you need to create a GUI class that inherits from QDialog, which is the base class of all dialog windows. A dialog window is always a top-level window that you can use as the main window for your Dialog-Style application.
Note: Dialog windows are also commonly used in Main Window-Style applications for brief communication and interaction with the user.
When dialog windows are used to communicate with the user, they may be:
Dialog windows can also provide a return value and have default buttons (for example, OK and Cancel).
A dialog is always a top-level widget. If it has a parent, then its default location is centered on top of the parent’s top-level widget. This kind of dialog will also share the parent’s taskbar entry. If you don’t set a parent for a given dialog, then the dialog will get its own entry in the system’s taskbar.
Here’s an example of how you’d use QDialog to develop a Dialog-Style application:
# Filename: dialog.py
"""Dialog-Style application."""
import sys
from PyQt5.QtWidgets import QApplication
from PyQt5.QtWidgets import QDialog
from PyQt5.QtWidgets import QDialogButtonBox
from PyQt5.QtWidgets import QFormLayout
from PyQt5.QtWidgets import QLineEdit
from PyQt5.QtWidgets import QVBoxLayout
class Dialog(QDialog):
    """Dialog."""
    def __init__(self, parent=None):
"""Initializer."""
super().__init__(parent)
self.setWindowTitle('QDialog')dlgLayout = QVBoxLayout()
formLayout = QFormLayout()
formLayout.addRow('Name:', QLineEdit())formLayout.addRow('Age:', QLineEdit())formLayout.addRow('Job:', QLineEdit())formLayout.addRow('Hobbies:', QLineEdit())dlgLayout.addLayout(formLayout)
btns = QDialogButtonBox()
btns.setStandardButtons(
QDialogButtonBox.Cancel | QDialogButtonBox.Ok)
dlgLayout.addWidget(btns)
self.setLayout(dlgLayout)
if __name__ == '__main__':
app = QApplication(sys.argv)
dlg = Dialog()
dlg.show()
sys.exit(app.exec_())
This application is a bit more elaborate. Here’s what’s going on:
Note: If you look at line 26 in the code block above, then you’ll notice that layout managers can be nested inside one another. You can nest layouts by calling .addLayout() on the container layout and passing in the nested layout as an argument to this method.
The code block above displays the following window:
This is the GUI that you created using QFormLayout for the widgets and QVBoxLayout for the general application’s layout (dlgLayout in line 20).
Main Windows
Most of the time, your GUI applications will be Main Window-Style. This means that they’ll have a menu bar, some toolbars, a status bar, and a central widget that will be the GUI’s main element. It’s also common that your apps will have several dialog windows to accomplish secondary actions that depend on user input.
You’ll use the class QMainWindow to develop Main Window-Style applications. You need to inherit from QMainWindow to create your main GUI class. An instance of a class that derives from QMainWindow is considered to be a main window. QMainWindow provides a framework for building your application’s GUI. The class has its own built-in layout, which you can use to place the following:
You can’t create a main window without first setting a central widget. You must have a central widget, even if it’s just a placeholder. When this is the case, you can use a QWidget object as your central widget. You can set the main window’s central widget with .setCentralWidget(). The main window’s layout will allow you to have only one central widget, but it can be a single or a composite widget.
The following code example shows you how to use QMainWindow to create a Main Window-Style application:
# Filename: main_window.py
"""Main Window-Style application."""
import sys
from PyQt5.QtWidgets import QApplication
from PyQt5.QtWidgets import QLabel
from PyQt5.QtWidgets import QMainWindow
from PyQt5.QtWidgets import QStatusBar
from PyQt5.QtWidgets import QToolBar
class Window(QMainWindow):
"""Main Window."""
def __init__(self, parent=None):
"""Initializer."""
super().__init__(parent)
self.setWindowTitle('QMainWindow')self.setCentralWidget(QLabel("I'm the Central Widget"))self._createMenu()
self._createToolBar()
self._createStatusBar()
def _createMenu(self):
self.menu = self.menuBar().addMenu("&Menu")self.menu.addAction('&Exit', self.close)def _createToolBar(self):
tools = QToolBar()
self.addToolBar(tools)
tools.addAction('Exit', self.close)def _createStatusBar(self):
status = QStatusBar()
status.showMessage("I'm the Status Bar")self.setStatusBar(status)
if __name__ == '__main__':
app = QApplication(sys.argv)
win = Window()
win.show()
sys.exit(app.exec_())
Here’s how this code works:
Note: When you implement different GUI components in their own method, you’re making your code more readable and more maintainable. This is not a requirement, however, so you’re free to organize your code in the way you like best.
When you run the above code, you’ll see a window like the following:
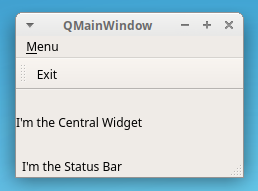
You can see that your Main Window-Style application has the following components:
So far, you’ve covered some of the more important graphical components of PyQt5’s set of widgets. In the next two sections, you’ll cover some other important concepts related to PyQt GUI applications.
Applications
The most basic class you’ll use when developing PyQt GUI applications is QApplication. This class is at the core of any PyQt application. It manages the application’s control flow as well as its main settings. In PyQt, any instance of QApplication is considered to be an application. Every PyQt GUI application must have one QApplication object. Some of the application’s responsibilities include:
These are just some of the core responsibilities of QApplication. As you can see, this is a fundamental class when it comes to developing PyQt GUI applications!
One of the most important responsibilities of QApplication is to provide the event loop and the entire event handling mechanism. Let’s take a closer look at the event loop now.
Event Loops
GUI applications are event-driven. This means that functions and methods are executed in response to user actions like clicking on a button, selecting an item from a combo box, entering or updating the text in a text edit, pressing a key on the keyboard, and so on. These user actions are generally called events.
Events are commonly handled by an event loop (also called the main loop). An event loop is an infinite loop in which all events from the user, the window system, and any other sources are processed and dispatched. The event loop waits for an event to occur and then dispatches it to perform some task. The event loop continues to work until the application is terminated.
Event loops are used by all GUI applications. The event loop is kind of an infinite loop that waits for the occurrence of events. If an event happens, then the loop checks if the event is a Terminate event. In that case, the loop is terminated and the application exits. Otherwise, the event is sent to the application’s event queue for further processing, and the loop starts again.
In PyQt, you can run the application’s event loop by calling .exec_() on the QApplication object.
Note: PyQt was first developed to target Python 2, which already has an exec keyword. In earlier versions, an underscore was added to the end .exec_() to help avoid name conflicts.
PyQt5 targets Python 3, which doesn’t have an exec keyword. Still, the library provides two methods that start the event loop:
This means that you can remove .exec_() from your code, and you can safely use .exec() instead.
For an event to trigger a response action, you need to connect the event with the action you want to be executed. In PyQt5, you can establish that connection by using the signals and slots mechanism. You’ll cover these in the next section.
Signals and Slots
PyQt widgets act as event-catchers. This means that every widget can catch a specific number of events, like mouse clicks, keypresses, and so on. In response to these events, widgets always emit a signal, which is a kind of message that announces a change in its state.
The signal on its own doesn’t perform any action. If you want a signal to trigger an action, then you need to connect it to a slot. This is the function or method that will perform an action whenever the connecting signal is emitted. You can use any Python callable (or callback) as a slot.
If a signal is connected to a slot, then the slot is called whenever the signal is emitted. If a signal isn’t connected to any slot, then nothing happens and the signal is ignored. Here are some of the most useful features of this mechanism:
You can use the following syntax to connect a signal to a slot:
widget.signal.connect(slot_function)
This will connect slot_function to widget.signal. Whenever signal is emitted, slot_function() will be called.
This code shows you how to use the signals and slots mechanism:
# Filename: signals_slots.py
"""Signals and slots example."""
import sys
from PyQt5.QtWidgets import QApplication
from PyQt5.QtWidgets import QLabel
from PyQt5.QtWidgets import QPushButton
from PyQt5.QtWidgets import QVBoxLayout
from PyQt5.QtWidgets import QWidget
def greeting():
"""Slot function."""
if msg.text():
msg.setText("")else:
msg.setText("Hello World!")app = QApplication(sys.argv) window = QWidget() window.setWindowTitle('Signals and slots') layout = QVBoxLayout() btn = QPushButton('Greet') btn.clicked.connect(greeting) # Connect clicked to greeting() layout.addWidget(btn) msg = QLabel('') layout.addWidget(msg) window.setLayout(layout) window.show() sys.exit(app.exec_())In line 13, you create greeting(), which you’ll use as a slot. Then in line 26, you connect the button’s clicked signal to greeting(). This way, whenever the user clicks on the button, greeting() is called and msg will alternate between the message Hello World! and an empty string:
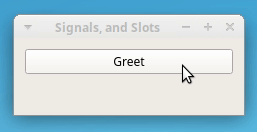
When you click on Greet, the Hello World! message will appear and disappear on your screen.
Note: Every widget has its own set of predefined signals. You can check them out on the widget’s documentation page.
If your slot function needs to receive extra arguments, then you can pass them in by using functools.partial. For example, you can modify greeting() as follows:
def greeting(who):
    """Slot function."""
    if msg.text():
        msg.setText('')
    else:
        msg.setText(f'Hello {who}')
Now, greeting() needs to receive an argument called who. If you want to connect this new version of greeting() to the btn.clicked signal, then you can do something like this:
btn.clicked.connect(functools.partial(greeting, 'World!'))
For this code to work, you need to import functools first. The call to functools.partial() returns an object that behaves similarly to calling greeting() with who=’World!’. Now, when the user clicks on the button, the message ‘Hello World!’ will be shown in the label as well as before.
Note: You can also use lambda to connect a signal to a slot that requires extra arguments. For a practice exercise, try to code the above example using lambda instead of functools.partial().
The signals and slots mechanism is what you’ll use to give life to your PyQt5 GUI applications. This mechanism will allow you to turn user events into concrete actions. You can dive deeper into the signals and slots mechanism by taking a look at the PyQt5 documentation.
Now you’ve finished covering the most important concepts of PyQt5. With this knowledge and the library’s documentation at hand, you’re ready to start developing your own GUI applications. In the next section, you’ll build your first fully-functional GUI application.
Let’s go for it!
Creating a Calculator With Python and PyQt
In this section, you’re going to develop a calculator using the Model-View-Controller (MVC) design pattern. This pattern has three layers of code, each with different roles:
Here’s a step-by-step MVC pattern for a GUI desktop application:
You’ll use this MVC design pattern to build your calculator.
Creating the Skeleton
You’ll start by implementing a basic skeleton for your application, called pycalc.py. You can find this script and the rest of the source code at the link below:
Download Code: Click here to download the code you’ll use to build a calculator in Python with PyQt in this tutorial.
If you’d prefer to code the project on your own, then go ahead and create pycalc.py in your current working directory. Then, open the file in your code editor and type the following code:
#!/usr/bin/env python3

# Filename: pycalc.py

"""PyCalc is a simple calculator built using Python and PyQt5."""

import sys

# Import QApplication and the required widgets from PyQt5.QtWidgets
from PyQt5.QtWidgets import QApplication
from PyQt5.QtWidgets import QMainWindow
from PyQt5.QtWidgets import QWidget

__version__ = '0.1'
__author__ = 'Leodanis Pozo Ramos'

# Create a subclass of QMainWindow to setup the calculator's GUI
class PyCalcUi(QMainWindow):
    """PyCalc's View (GUI)."""
    def __init__(self):
        """View initializer."""
        super().__init__()
        # Set some main window's properties
        self.setWindowTitle('PyCalc')
        self.setFixedSize(235, 235)
        # Set the central widget
        self._centralWidget = QWidget(self)
        self.setCentralWidget(self._centralWidget)

# Client code
def main():
    """Main function."""
    # Create an instance of QApplication
    pycalc = QApplication(sys.argv)
    # Show the calculator's GUI
    view = PyCalcUi()
    view.show()
    # Execute the calculator's main loop
    sys.exit(pycalc.exec_())

if __name__ == '__main__':
    main()
This script implements all the code you’ll need to run a basic GUI application. You’ll use this skeleton to build your calculator. Here’s how it works:
When you run the script, the following window will appear on your screen:
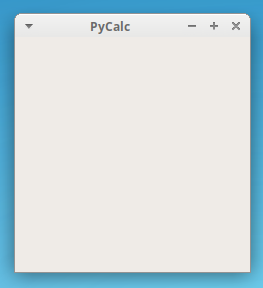
This is your GUI application skeleton.
Completing the View
The GUI you have at this point doesn’t really look like a calculator. Let’s finish the GUI by adding the display and buttons for the numbers. You’ll also add buttons for basic math operations and for clearing the display.
First, you’ll need to add the following imports to the top of your file:
from PyQt5.QtCore import Qt
from PyQt5.QtWidgets import QGridLayout
from PyQt5.QtWidgets import QLineEdit
from PyQt5.QtWidgets import QPushButton
from PyQt5.QtWidgets import QVBoxLayout
You’re going to use a QVBoxLayout for the calculator’s general layout. You’ll also use a QGridLayout object to arrange the buttons. Finally, you import QLineEdit for the display and QPushButton for the buttons. There should now be eight import statements at the top of your file.
Now you can update the initializer for PyCalcUi:
# Create a subclass of QMainWindow to setup the calculator's GUI
class PyCalcUi(QMainWindow):
    """PyCalc's View (GUI)."""
    def __init__(self):
        """View initializer."""
        super().__init__()
        # Set some main window's properties
        self.setWindowTitle('PyCalc')
        self.setFixedSize(235, 235)
        # Set the central widget and the general layout
        self.generalLayout = QVBoxLayout()
        self._centralWidget = QWidget(self)
        self.setCentralWidget(self._centralWidget)
        self._centralWidget.setLayout(self.generalLayout)
        # Create the display and the buttons
        self._createDisplay()
        self._createButtons()
Here, you’ve added the highlighted lines of code. You’ll use a QVBoxLayout to place the display at the top and the buttons in a grid layout at the bottom.
The calls to ._createDisplay() and ._createButtons() won’t work, because you haven’t yet implemented those methods. Let’s fix that by coding ._createDisplay():
class PyCalcUi(QMainWindow):
    # Snip
    def _createDisplay(self):
        """Create the display."""
        # Create the display widget
        self.display = QLineEdit()
        # Set some display's properties
        self.display.setFixedHeight(35)
        self.display.setAlignment(Qt.AlignRight)
        self.display.setReadOnly(True)
        # Add the display to the general layout
        self.generalLayout.addWidget(self.display)
To create the display widget, you use a QLineEdit object. Then you set the following display properties:
The last line adds the display to the calculator’s general layout with generalLayout.addWidget().
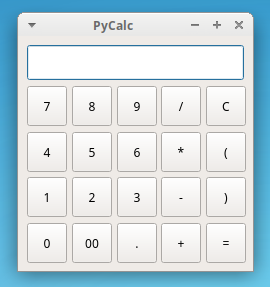
Next, you’ll implement ._createButtons() to create buttons for your calculator. You’ll use a dictionary to hold each button’s text and position on the grid. You’ll also use QGridLayout to arrange the buttons on the calculator’s window. The final code will look like this:
class PyCalcUi(QMainWindow):
    # Snip
    def _createButtons(self):
        """Create the buttons."""
        self.buttons = {}
        buttonsLayout = QGridLayout()
        # Button text | position on the QGridLayout
        buttons = {'7': (0, 0),
                   '8': (0, 1),
                   '9': (0, 2),
                   '/': (0, 3),
                   'C': (0, 4),
                   '4': (1, 0),
                   '5': (1, 1),
                   '6': (1, 2),
                   '*': (1, 3),
                   '(': (1, 4),
                   '1': (2, 0),
                   '2': (2, 1),
                   '3': (2, 2),
                   '-': (2, 3),
                   ')': (2, 4),
                   '0': (3, 0),
                   '00': (3, 1),
                   '.': (3, 2),
                   '+': (3, 3),
                   '=': (3, 4),
                  }
        # Create the buttons and add them to the grid layout
        for btnText, pos in buttons.items():
            self.buttons[btnText] = QPushButton(btnText)
            self.buttons[btnText].setFixedSize(40, 40)
            buttonsLayout.addWidget(self.buttons[btnText], pos[0], pos[1])
            # Add buttonsLayout to the general layout
            self.generalLayout.addLayout(buttonsLayout)
You first create an empty dictionary self.buttons to hold the calculator buttons. Then, you create a temporary dictionary to store their labels and relative positions on the grid layout (buttonsLayout). Inside the for loop, you create the buttons and add them to both self.buttons and buttonsLayout. Every button will have a fixed size of 40×40 pixels, which you set with .setFixedSize(40, 40).
Note: When it comes to widget size, you’ll rarely find measurement units in the PyQt documentation. It’s assumed that the measurement unit is pixels (except for QPrinter, which uses points).
Now, the calculator’s GUI (or view) can show the display and the buttons. But there’s still no way to update the information shown in the display. You can fix this by adding a few extra methods:
These methods will form the GUI public interface and complete the view class for your Python calculator. Here’s a possible implementation:
class PyCalcUi(QMainWindow):
    # Snip
    def setDisplayText(self, text):
        """Set display's text."""
        self.display.setText(text)
        self.display.setFocus()

    def displayText(self):
        """Get display's text."""
        return self.display.text()

    def clearDisplay(self):
        """Clear the display."""
        self.setDisplayText('')
Here’s what each function does:
Now your calculator’s GUI is ready! When you run the application, you’ll see a window like this one:
You’ve completed the calculator’s GUI interface. However, if you try to do some calculations, then you’ll notice that the calculator doesn’t do anything just yet. That’s because you haven’t implemented the model or the controller. Next, you’ll add a basic controller class to start giving life to your calculator.
Creating a Basic Controller
In this section, you’re going to code the calculator’s controller class. This class will connect the view to the model. You’ll use the controller class to make the calculator perform actions in response to user events. You’ll start with the following import:
from functools import partial
At the top of pycalc.py, you import partial() to connect signals with methods that need to take extra arguments.
Your controller class needs to perform three main tasks:
This will ensure that your calculator is working correctly. Here’s how you code the controller class:
# Create a Controller class to connect the GUI and the model
class PyCalcCtrl:
    """PyCalc Controller class."""
    def __init__(self, view):
        """Controller initializer."""
        self._view = view
        # Connect signals and slots
        self._connectSignals()

    def _buildExpression(self, sub_exp):
        """Build expression."""
        expression = self._view.displayText() + sub_exp
        self._view.setDisplayText(expression)

    def _connectSignals(self):
        """Connect signals and slots."""
        for btnText, btn in self._view.buttons.items():
            if btnText not in {'=', 'C'}:
                btn.clicked.connect(partial(self._buildExpression, btnText))

        self._view.buttons['C'].clicked.connect(self._view.clearDisplay)
The first thing you do is give PyCalcCtrl an instance of the view PyCalcUi. You’ll use this instance to gain full access to the view’s public interface. Next, you create ._buildExpression() to handle the creation of math expressions. This method also updates the calculator’s display in response to user input.
Finally, you use ._connectSignals() to connect the printable buttons with ._buildExpression(). This allows your users to create math expressions by clicking on the calculator’s buttons. In the last line, you connect the clear button (C) to ._view.clearDisplay(). This method will clear up the text on the display.
For this new controller class to work, you need to update main():
# Client code
def main():
    """Main function."""
    # Create an instance of QApplication
    pycalc = QApplication(sys.argv)
    # Show the calculator's GUI
    view = PyCalcUi()
    view.show()
    # Create instances of the model and the controller
    PyCalcCtrl(view=view)
    # Execute calculator's main loop
    sys.exit(pycalc.exec_())
This code creates an instance of PyCalcCtrl(view=view) with the view passed in as an argument. This will initialize the controller and connect the signals and slots to give your calculator some functionality.
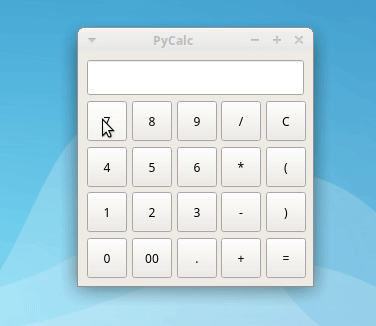
If you run the application, then you’ll see something like the following:

As you can see, the calculator already has some useful functionalities! Now, you can build math expressions by clicking on the buttons. Notice that the equals sign (=) doesn’t work yet. To fix this, you need to implement the calculator’s model.
Implementing the Model
The model is the layer of code that takes care of the business logic. In this case, the business logic is all about basic math calculations. Your model will evaluate the math expressions introduced by your users. Since the model needs to handle errors, you’re going to define the following global constant:
ERROR_MSG = 'ERROR'
This is the message the user will see if they introduce an invalid math expression.
Your model will be a single function:
# Create a Model to handle the calculator's operation
def evaluateExpression(expression):
    """Evaluate an expression."""
    try:
        result = str(eval(expression, {}, {}))
    except Exception:
        result = ERROR_MSG

    return result
Here, you use eval() to evaluate a string as an expression. If this is successful, then you’ll return the result. Otherwise, you’ll return the error message. Note that this function isn’t perfect. It has a couple of important issues:
You’re free to rework the function to make it more reliable and secure. For this tutorial, you’ll use the function as-is.
Completing the Controller
Once you’ve completed the calculator’s model, you can finish the controller. The final version of PyCalcCtrl will include logic to process the calculations and to make sure the equals sign (=) works correctly:
# Create a Controller class to connect the GUI and the model
class PyCalcCtrl:
    """PyCalc's Controller."""
    def __init__(self, model, view):
        """Controller initializer."""
        self._evaluate = model
        self._view = view
        # Connect signals and slots
        self._connectSignals()

    def _calculateResult(self):
        """Evaluate expressions."""
        result = self._evaluate(expression=self._view.displayText())
        self._view.setDisplayText(result)

    def _buildExpression(self, sub_exp):
        """Build expression."""
        if self._view.displayText() == ERROR_MSG:
            self._view.clearDisplay()

        expression = self._view.displayText() + sub_exp
        self._view.setDisplayText(expression)

    def _connectSignals(self):
        """Connect signals and slots."""
        for btnText, btn in self._view.buttons.items():
            if btnText not in {'=', 'C'}:
                btn.clicked.connect(partial(self._buildExpression, btnText))

        self._view.buttons['='].clicked.connect(self._calculateResult)
        self._view.display.returnPressed.connect(self._calculateResult)
        self._view.buttons['C'].clicked.connect(self._view.clearDisplay)
The new lines of code are highlighted. First, you add a new parameter to the init function. Now the class receives instances from both the model and the view. Then in ._calculateResult(), you take the display’s content, evaluate it as a math expression, and finally show the result in the display.
You also add an if statement to ._buildExpression() to check if an error has occurred. If so, then you clear the display and start over with a new expression. Finally, you add two more connections inside ._connectSignals(). The first enables the equals sign (=). The second ensures that when the user hits Enter, the calculator will process the expression as expected.
For all this code to work, you need to update main():
# Client code
def main():
    """Main function."""
    # Create an instance of `QApplication`
    pycalc = QApplication(sys.argv)
    # Show the calculator's GUI
    view = PyCalcUi()
    view.show()
    # Create instances of the model and the controller
    model = evaluateExpression
    PyCalcCtrl(model=model, view=view)
    # Execute calculator's main loop
    sys.exit(pycalc.exec_())
Here, your model holds a reference to evaluateExpression(). In addition, PyCalcCtrl() now receives two arguments: the model and the view.
Running the Calculator
Now that you’ve finished the code, it’s time for a test! If you run the application, then you’ll see something like this:
To use PyCalc, enter a valid math expression with your mouse. Then, press Enter or click on the equals sign (=) to see the result on the calculator’s display.
Congrats! You’ve developed your first fully-functional GUI desktop application with Python and PyQt!
Additional Tools
PyQt5 offers quite a useful set of additional tools to help you build solid, modern, and full-featured GUI applications. Here are some of the most remarkable tools you can use:
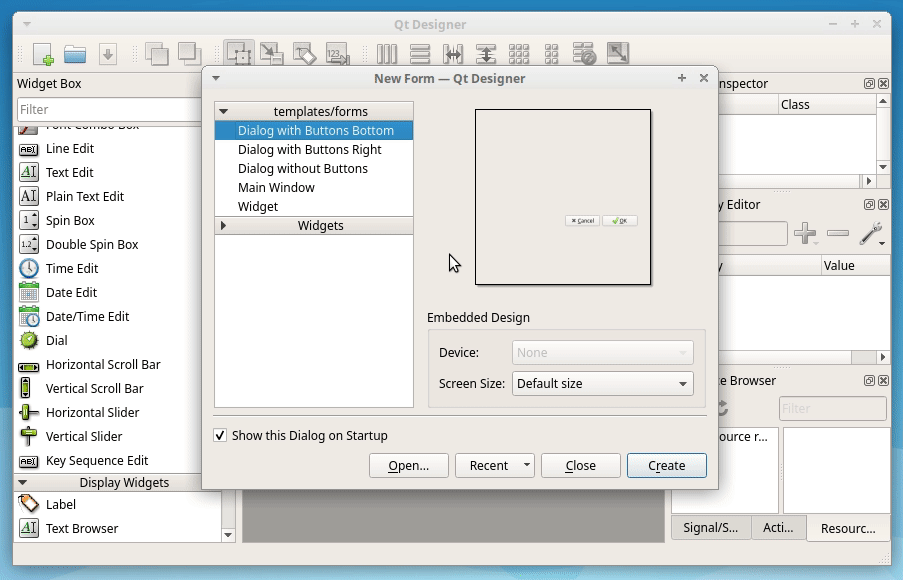
Qt Designer is the Qt tool for designing and building graphical user interfaces. You can use it to design widgets, dialogs, or complete main windows by using on-screen forms and a drag-and-drop mechanism. The following figure shows some of the Qt Designer’s features:
Qt Designer uses XML .ui files to store your GUI designs. You can load them with QUiLoader. PyQt includes a module called uic to help with this. You can also convert the .ui file content into Python code with a command-line tool called pyuic5.
PyQt5 also provides a comprehensive set of tools for the internationalization of apps into local languages. pylupdate5 creates and updates translation (.ts) files. Then, Qt Linguist updates the generated .ts files with translations of the strings. It also releases the .ts files as .qm files. These .qm files are compact binary equivalents that can be used directly by the application.
Finally, you can use the PyQt5 resource system, which is a facility for embedding resources such as icons and translation files. To use this tool, you need to generate a .qrc file. This is an XML file that’s used to specify which resource files are to be embedded. Once you have this file ready, you can use pyrcc5 to generate a Python module that contains the embedded resources.
Conclusion
Graphical User Interface (GUI) desktop applications still hold a substantial share of the software development market. Python offers a handful of frameworks and libraries that can help you develop modern and robust GUI applications.
In this tutorial, you learned how to use PyQt, which is arguably one of the most popular and solid libraries for GUI desktop application development in Python. Now you know how to effectively use both Python and PyQt to build modern GUI desktop applications.
You’re now able to:
Further Reading
Although the PyQt5 Documentation is the first resource listed here, some important parts are still missing or incomplete. Fortunately, you can use the PyQt4 Documentation to fill in the blanks. The Class Reference is particularly useful for gaining a complete understanding of widgets and classes.
If you’re using the PyQt4 documentation as a reference for PyQt5 classes, then bear in mind that the classes will be slightly different and may behave differently, too. Another option would be to use the original Qt v5 Documentation and its Class Reference instead. In this case, you may need some background in C++ to properly understand the code samples.
--
--