-
PYTHON > lire et analyser un PDF
- Working with Images in Python
- Python | Working with buttons in Kivy
- Python | Working with Pandas and XlsxWriter | Set – 2
- Working With JSON Data in Python
- Python | Working with Pandas and XlsxWriter | Set – 3
- Internal working of list in Python
- Python | Working with buttons in Kivy with .kv file
- Python | Working with date and time using Pandas
- Downloading files from web using Python
- Un élément texte simple : « salut »
- Un élément texte, avec coloration de font et de police : « les potes »
- Un art-element, généré avec word : « d :0) »
- GitHub – https://github.com/euske/pdfminer
- PyPI – https://pypi.python.org/pypi/pdfminer/
- Webpage – https://euske.github.io/pdfminer/
- XML
- JSON
- CSV
- -o output file name
- -p comma-separated list of page numbers to extract
- -t output format (text/html/xml/tag[for Tagged PDFs])
- -O dirname (triggers extraction of images from PDF into directory)
- -P password
- Camelot gives you complete control over table extraction by letting you tweak its settings.
- Bad tables can be discarded based on metrics like accuracy and whitespace, without ever having to manually look at each table.
- Each table is a pandas DataFrame, which seamlessly integrates into ETL and data analysis workflows.
- You can export tables to multiple formats, including CSV, JSON, Excel and HTML.
- When using Stream, tables aren’t autodetected. Stream treats the whole page as a single table, which gives bad output when there are multiple tables on the page.
- Camelot only works with text-based PDFs and not scanned documents. (As Tabula explains, “If you can click-and-drag to select text in your table in a PDF viewer… then your PDF is text-based”.)
- XML
- JSON
- CSV
- Using Wand to extract images from PDFs in python
- Ned Batchelder – Extracting JPGs from PDFs
- Extracting PDF Metadata and Text with Python
- StackOverflow: Extracting text from a PDF file using PDFMiner in python?
- It isn’t a csv.
- There are things other than the data we care about in the table ie: summaries.
- It won’t update itself.
PyPDF2
pip install PyPDF2
Extracting text from PDF file
import PyPDF2# importing required modules
# creating a pdf file object
pdfFileObj = open(‘example.pdf’, ‘rb’)
# creating a pdf reader object
pdfReader = PyPDF2.PdfFileReader(pdfFileObj)
# printing number of pages in pdf file
print(pdfReader.numPages)# creating a page object
pageObj = pdfReader.getPage(0)# extracting text from page
print(pageObj.extractText())
# closing the pdf file object
pdfFileObj.close()
Let us try to understand the above code in chunks:
pdfFileObj = open('example.pdf', 'rb')We opened the example.pdf in binary mode. and saved the file object as pdfFileObj.
pdfReader = PyPDF2.PdfFileReader(pdfFileObj)
Here, we create an object of PdfFileReader class of PyPDF2 module and pass the pdf file object & get a pdf reader object.
print(pdfReader.numPages)
numPages property gives the number of pages in the pdf file. For example, in our case, it is 20 (see first line of output).
pageObj = pdfReader.getPage(0)
Now, we create an object of PageObject class of PyPDF2 module. pdf reader object has function getPage() which takes page number (starting form index 0) as argument and returns the page object.
print(pageObj.extractText())
Page object has function extractText() to extract text from the pdf page.
pdfFileObj.close()
At last, we close the pdf file object.
Note: While PDF files are great for laying out text in a way that’s easy for people to print and read, they’re not straightforward for software to parse into plaintext. As such, PyPDF2 might make mistakes when extracting text from a PDF and may even be unable to open some PDFs at all. There isn’t much you can do about this, unfortunately. PyPDF2 may simply be unable to work with some of your particular PDF files.
Rotating PDF pages
# importing the required modules
import PyPDF2
def PDFrotate(origFileName, newFileName, rotation):
# creating a pdf File object of original pdf
pdfFileObj = open(origFileName, ‘rb’)
# creating a pdf Reader object
pdfReader = PyPDF2.PdfFileReader(pdfFileObj)
# creating a pdf writer object for new pdf
pdfWriter = PyPDF2.PdfFileWriter()
# rotating each page
for page in range(pdfReader.numPages):
# creating rotated page object
pageObj = pdfReader.getPage(page)
pageObj.rotateClockwise(rotation)
# adding rotated page object to pdf writer
pdfWriter.addPage(pageObj)
# new pdf file object
newFile = open(newFileName, ‘wb’)
# writing rotated pages to new file
pdfWriter.write(newFile)
# closing the original pdf file object
pdfFileObj.close()
# closing the new pdf file object
newFile.close()
def main():
# original pdf file name
origFileName = ‘example.pdf’
# new pdf file name
newFileName = ‘rotated_example.pdf’
# rotation angle
rotation = 270
# calling the PDFrotate function
PDFrotate(origFileName, newFileName, rotation)
if __name__ == "__main__":
# calling the main function
main()
Here you can see how the first page of rotated_example.pdf looks like ( right image) after rotation:
For rotation, we first create pdf reader object of the original pdf.
pdfWriter = PyPDF2.PdfFileWriter()
Rotated pages will be written to a new pdf. For writing to pdfs, we use object of PdfFileWriter class of PyPDF2 module.
for page in range(pdfReader.numPages):
   pageObj = pdfReader.getPage(page)
   pageObj.rotateClockwise(rotation)
   pdfWriter.addPage(pageObj)
Now, we iterate each page of original pdf. We get page object by getPage() method of pdf reader class. Now, we rotate the page by rotateClockwise() method of page object class. Then, we add page to pdf writer object using addPage() method of pdf writer class by passing the rotated page object.
newFile = open(newFileName, 'wb')
pdfWriter.write(newFile)
pdfFileObj.close()
newFile.close()
Now, we have to write the pdf pages to a new pdf file. Firstly we open the new file object and write pdf pages to it using write() method of pdf writer object. Finally, we close the original pdf file object and the new file object.
Merging PDF files
# importing required modules
import PyPDF2
def PDFmerge(pdfs, output):
# creating pdf file merger object
pdfMerger = PyPDF2.PdfFileMerger()
# appending pdfs one by one
for pdf in pdfs:
with open(pdf, ‘rb’) as f:
pdfMerger.append(f)
# writing combined pdf to output pdf file
with open(output, ‘wb’) as f:
pdfMerger.write(f)
def main():
# pdf files to merge
pdfs = ['example.pdf', 'rotated_example.pdf']
# output pdf file name
output = ‘combined_example.pdf’
# calling pdf merge function
PDFmerge(pdfs = pdfs, output = output)
if __name__ == "__main__":
# calling the main function
main()
Output of above program is a combined pdf, combined_example.pdf obtained by merging example.pdf and rotated_example.pdf.
Let us have a look at important aspects of this program:
pdfMerger = PyPDF2.PdfFileMerger()
For merging, we use a pre-built class, PdfFileMerger of PyPDF2 module.
Here, we create an object pdfMerger of pdf merger classfor pdf in pdfs: with open(pdf, 'rb') as f: pdfMerger.append(f)Now, we append file object of each pdf to pdf merger object using append() method.
with open(output, 'wb') as f:
        pdfMerger.write(f)
Finally, we write the pdf pages to the output pdf file using write method of pdf merger object.
Splitting PDF file
# importing the required modules
import PyPDF2
def PDFsplit(pdf, splits):
# creating input pdf file object
pdfFileObj = open(pdf, ‘rb’)
# creating pdf reader object
code> pdfReader = PyPDF2.PdfFileReader(pdfFileObj)
# starting index of first slice
start = 0
# starting index of last slice
end = splits[0]
for i in range(len(splits)+1):
# creating pdf writer object for (i+1)th split
pdfWriter = PyPDF2.PdfFileWriter()
# output pdf file name
outputpdf = pdf.split(‘.pdf’)[0] + str(i) + ‘.pdf’
# adding pages to pdf writer object
for page in range(start,end):
pdfWriter.addPage(pdfReader.getPage(page))
# writing split pdf pages to pdf file
with open(outputpdf, "wb") as f:
pdfWriter.write(f)
# interchanging page split start position for next split
start = end
try:
# setting split end position for next split
end = splits[i+1]
except IndexError:
# setting split end position for last split
end = pdfReader.numPages
# closing the input pdf file object
pdfFileObj.close()
def main():
# pdf file to split
pdf = ‘example.pdf’
# split page positions
splits = [2,4]
# calling PDFsplit function to split pdf
PDFsplit(pdf, splits)
if __name__ == "__main__":
# calling the main function
main()
Output will be three new PDF files with split 1 (page 0,1), split 2(page 2,3), split 3(page 4-end).
No new function or class has been used in above python program. Using simple logic and iterations, we created the splits of passed pdf according to the passed list splits.
References:
Recommended Posts:
Common Python Libraries
PDFMiner is a tool for extracting information from PDF documents. Unlike other PDF-related tools, it focuses entirely on getting and analyzing text data.
PyPDF2 capable of splitting, merging together, cropping, and transforming the pages of PDF files. It can also add custom data, viewing options, and passwords to PDF files. It can retrieve text and metadata from PDFs as well as merge entire files together.
Tabula-py is a simple Python wrapper of tabula-java, which can read the table of PDF. You can read tables from PDF and convert into pandas’ DataFrame. tabula-py also enables you to convert a PDF file into CSV/TSV/JSON file.
Slate is wrapper Implementation of PDFMiner
PDFQuery is a light wrapper around pdfminer, lxml and pyquery. It’s designed to reliably extract data from sets of PDFs with as little code as possible.
xpdf Python wrapper for xpdf (currently just the “pdftotext” utility)
Extraire le texte
First, we need to Install the
pip install PyPDF2
Following is the code to extract simple Text from pdf using PyPDF2
# modules for import PyPDF2# pdf file object
# you can find find the pdf file with complete code in below
pdfFileObj = open('example.pdf', 'rb')
# pdf reader
objectpdfReader = PyPDF2.PdfFileReader(pdfFileObj)
# number of pages in pdf
print(pdfReader.numPages)
# a page
objectpageObj = pdfReader.getPage(0)
# extracting text from page.
# this will print the text you can also save that into String
print(pageObj.extractText())
You can read more Details from here
import PyPDF2
creating a pdf file object :
pdfFileObj = open(‘chemin/fichier.pdf’, ‘rb’)creating a pdf reader object :
pdfReader = PyPDF2.PdfFileReader(pdfFileObj, strict=False)getting the number of pages in pdf file :
pdfReader.getNumPages()creating a page object :
pageObj = pdfReader.getPage(0)
page_content = pageObj.extractText()
print(page_content)import PyPDF2 pdfFileObj = open('fichier.pdf','rb') pdfReader = PyPDF2.PdfFileReader(pdfFileObj, strict=False) number_of_pages =pdfReader.getNumPages() pageObj = pdfReader.getPage(0) page_content = pageObj.extractText() print(page_content) pdfFileObj.close()LIRE LES TABLEAUX DE DONNEES
pip install tabula-pyimport tabula df = tabula.read_pdf('fichier.pdf') # in order to print first 5 lines of Table df.head()If you Pdf file contain Multiple Table
df = tabula.read_pdf(“offense.pdf”,multiple_tables=True)
you can extract Information from the specific part of any specific page of PDF
tabula.read_pdf("offense.pdf", area=(126,149,212,462), pages=1)If you want the output into JSON Format
tabula.read_pdf("offense.pdf", output_format="json")—
PDFMiner
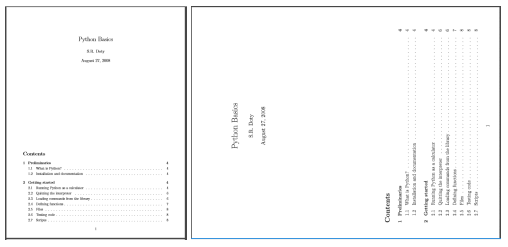
Pour le bien de cette démonstration, nous avons créé un document .pdf simple et prêt à l’emploi. Dans ce document on trouve les éléments suivants :
PDF avec écrit : Salut les potes
Installer Python 3 et PDFMiner
pip install pdfminer.six
https://github.com/pdfminer/pdfminer.six
Le code
Le script ci-dessous permet de lire le fichier .pdf, d’imprimer l’output, et d’enregistrer (si besoin) le fichier dans un fichier .txt.
from pdfminer.pdfinterp import PDFResourceManager, PDFPageInterpreter
from pdfminer.converter import TextConverter
from pdfminer.pdfpage import PDFPage
from io import BytesIO
import argparse
def pdf2xt(path):
   """
   Extract text from PDF file, and return
   the string contained inside
   :param path (str) path to the .pdf file
   :return: text (str) string extracted
   """
rsrcmgr = PDFResourceManager()
retstr = BytesIO()
device = TextConverter(rsrcmgr, retstr)
with open(path, "rb") as fp:  # open in 'rb' mode to read PDF bytes
interpreter = PDFPageInterpreter(rsrcmgr, device)
for page in PDFPage.get_pages(fp, check_extractable=True):
interpreter.process_page(page)
device.close()
text = retstr.getvalue()
retstr.close()
return text
if __name__ == '__main__':
# ARGUMENTS FOR THE EXTRACTOR
argparser = argparse.ArgumentParser()
argparser.add_argument("-s", "--source", required=True, help="path to input .pdf to be converted")
argparser.add_argument("-f", "--file", required=False, help="path to the ouput .txt file")
args = vars(argparser.parse_args())
source = args["source"]
file = args["file"]
# EXTRACTING TEXT
print('-- Extracting')
pdf_text = pdf2xt(source)
print('-- Output: {}'.format(pdf_text))
# SAVING TEXT IN .TXT FILE
if file:
print('-- Writing file')
with open(file, "wb") as f:
f.write(pdf_text)
print('-- File written here: {}'.format(file))
Vous pouvez également retrouver le script ici : https://gist.github.com/Lobstrio/b6aa541c141d44b8e93325562ce18171
Le script s’appelle pdf_parser.py. Pour faire tourner ce script dans la commande, ou le terminal, vous devez taper le nom du script, suivi du chemin vers le fichier .pdf à parser. Si vous le souhaitez, vous pouvez également ajouté un fichier cible, qui réceptionnera le texte extrait.
python3 pdf_parser.py -s "pdf_input.pdf" -f "output.txt"
Et lorsqu’on ouvre le fichier output_test.txt, voilà le rendu :
Salut les potes
Limitations connues
Ce code peut extraire du texte depuis des pdfs simples, d’une page. Toutefois, l’extraction de pdf plus complexe, composés de plusieurs pages et de plusieurs éléments (images, tableau) requiert un réglage plus fin.
—
Was looking for a simple solution to use for python 3.x and windows. There doesn’t seem to be support from textract, which is unfortunate, but if you are looking for a simple solution for windows/python 3 checkout the tika package, really straight forward for reading pdfs
from tika import parser

raw = parser.from_file('sample.pdf')
print(raw['content'])
—
Exporting Data From PDFs With Python
In this post, we will look at a variety of different packages that you can use to extract text. We will also learn how to extract some images from PDFs.
There are many times where you will want to extract data from a PDF and export it in a different format using Python. Unfortunately, there aren’t a lot of Python packages that do the extraction part very well. In this post, we will look at a variety of different packages that you can use to extract text. We will also learn how to extract some images from PDFs. While there is no complete solution for these tasks in Python, you should be able to use the information herein to get started. Once we have extracted the data we want, we will also look at how we can take that data and export it in a different format.
Let’s get started by learning how to extract text!
Extracting Text With PDFMiner
Probably the most well known is a package called PDFMiner. The PDFMiner package has been around since Python 2.4. Its primary purpose is to extract text from a PDF. In fact, PDFMiner can tell you the exact location of the text on the page as well as information about fonts. For Python 2.4-2.7, you can refer to the following websites for additional information on PDFMiner:
PDFMiner is not compatible with Python 3. Fortunately, there is a fork of PDFMiner called PDFMiner.six that works exactly the same. You can find it here: https://github.com/pdfminer/pdfminer.six
The directions for installing PDFMiner are out-dated at best. You can actually use pip to install it:
python -m pip install pdfminer
If you want to install PDFMiner for Python 3 (which is what you should probably be doing), then you have to do the install like this:
python -m pip install pdfminer.six
The documentation on PDFMiner is rather poor at best. You will most likely need to use Google and Stack Overflow to figure out how to use PDFMiner effectively outside of what is covered in this post.
Extracting All the Text
Sometimes you will want to extract all the text in the PDF. The PDFMiner package offers a couple of different methods that you can use to do this. We will look at some of the programmatic methods first. Let’s try reading all the text out of an Internal Revenue Service W9 form. You can get a copy here: https://www.irs.gov/pub/irs-pdf/fw9.pdf
Once you have the PDF properly saved off, we can look at the code:
import io
from pdfminer.converter import TextConverter
from pdfminer.pdfinterp import PDFPageInterpreter
from pdfminer.pdfinterp import PDFResourceManager
from pdfminer.pdfpage import PDFPage
def extract_text_from_pdf(pdf_path):
resource_manager = PDFResourceManager()
fake_file_handle = io.StringIO()
converter = TextConverter(resource_manager, fake_file_handle)
page_interpreter = PDFPageInterpreter(resource_manager, converter)
with open(pdf_path, 'rb') as fh:
for page in PDFPage.get_pages(fh,
caching=True,
check_extractable=True):
page_interpreter.process_page(page)
text = fake_file_handle.getvalue()
# close open handles
converter.close()
fake_file_handle.close()
if text:
return text
if __name__ == '__main__':
print(extract_text_from_pdf('w9.pdf'))The PDFMiner package tends to be a bit verbose when you use it directly. Here, we import various bits and pieces from various parts of PDFMiner. Since there is no documentation of any of these classes and no docstrings either, I won’t explain what they do in depth. Feel free to dig into the source code yourself if you’re really curious. However, I think we can kind of follow along with the code.
The first thing we do is create a resource manager instance. Then we create a file-like object via Python’s io module. If you are using Python 2, then you will want to use the StringIO module. Our next step is to create a converter. In this case, we choose the TextConverter, however you could also use an HTMLConverter or an XMLConverter if you wanted to. Finally, we create a PDF interpreter object that will take our resource manager and converter objects and extract the text.
The last step is to open the PDF and loop through each page. At the end, we grab all the text, close the various handlers, and print out the text to stdout.
Extracting Text by Page
Frankly, grabbing all the text from a multi-page document isn’t all that useful. Usually, you will want to do work on smaller subsets of the document instead. So, let’s rewrite the code so it extracts text on a page-by-page basis. This will allow us to examine the text, one page at a time:
# miner_text_generator.py
import io
from pdfminer.converter import TextConverter
from pdfminer.pdfinterp import PDFPageInterpreter
from pdfminer.pdfinterp import PDFResourceManager
from pdfminer.pdfpage import PDFPage
def extract_text_by_page(pdf_path):
with open(pdf_path, 'rb') as fh:
for page in PDFPage.get_pages(fh,
caching=True,
check_extractable=True):
resource_manager = PDFResourceManager()
fake_file_handle = io.StringIO()
converter = TextConverter(resource_manager, fake_file_handle)
page_interpreter = PDFPageInterpreter(resource_manager, converter)
page_interpreter.process_page(page)
text = fake_file_handle.getvalue()
yield text
# close open handles
converter.close()
fake_file_handle.close()
def extract_text(pdf_path):
for page in extract_text_by_page(pdf_path):
print(page)
print()
if __name__ == '__main__':
print(extract_text('w9.pdf'))In this example, we create a generator function that yields the text for each page. The extract_text function prints out the text of each page. This is where we could add some parsing logic to parse out what we want. Or we could just save the text (or HTML or XML) off as individual files for future parsing.
You will note that the text may not be in the order you expect. So you will definitely need to figure out the best way to parse out the text that you are interested in.
The nice thing about PDFMiner is that you can already “export” the PDF as text, HTML or XML.
You can also use PDFMiner’s command line tools, pdf2txt.py and dumppdf.py, to do the exporting for you if you don’t want to try to figure out PDFMiner yourself. According to the source code of pdf2txt.py, it can be used to export a PDF as plain text, HTML, XML, or “tags.”
Exporting Text via pdf2txt.py
The pdf2txt.py command line tool that comes with PDFMiner will extract text from a PDF file and print it out to stdout by default. It will not recognize text-based images, as PDFMiner does not support optical character recognition (OCR). Let’s try the simplest method of using it, which is just passing it the path to a PDF file. We will use the w9.pdf. Open up a terminal and navigate to the location that you have saved that PDF or modify the command below to point to that file:
pdf2txt.py w9.pdf
If you run this, it will print out all the text to stdout. You can also make pdf2txt.py write the text to file as text, HTML, XML, or “tagged PDF.” The XML format will give to the most information about the PDF as it contains the location of each letter in the document as well as font information. HTML is not recommended, as the markup pdf2txt generates tends to be ugly. Here’s how you can get different formats output:
pdf2txt.py -o w9.html w9.pdf
pdf2txt.py -o w9.xml w9.pdf
The first command will create an HTML document while the second will create an XML document.
The end result looks a bit off, but it’s not too bad. The XML it outputs is extremely verbose, so I can’t reproduce it all here. However, here is a snippet to give you an idea of what it looks like:
<pages>
<page id="1" bbox="0.000,0.000,611.976,791.968" rotate="0">
<textbox id="0" bbox="36.000,732.312,100.106,761.160">
<textline bbox="36.000,732.312,100.106,761.160">
<text font="JYMPLA+HelveticaNeueLTStd-Roman" bbox="36.000,736.334,40.018,744.496" size="8.162">F</text>
<text font="JYMPLA+HelveticaNeueLTStd-Roman" bbox="40.018,736.334,44.036,744.496" size="8.162">o</text>
<text font="JYMPLA+HelveticaNeueLTStd-Roman" bbox="44.036,736.334,46.367,744.496" size="8.162">r</text>
<text font="JYMPLA+HelveticaNeueLTStd-Roman" bbox="46.367,736.334,52.338,744.496" size="8.162">m</text>
<text font="JYMPLA+HelveticaNeueLTStd-Roman" bbox="52.338,736.334,54.284,744.496" size="8.162"> </text>
<text font="JYMPLA+HelveticaNeueLTStd-Roman" bbox="54.284,736.334,56.230,744.496" size="8.162"> </text>
<text font="JYMPLA+HelveticaNeueLTStd-Roman" bbox="56.230,736.334,58.176,744.496" size="8.162"> </text
><text font="JYMPLA+HelveticaNeueLTStd-Roman" bbox="58.176,736.334,60.122,744.496" size="8.162"> </text>
<text font="ZWOHBU+HelveticaNeueLTStd-BlkCn" bbox="60.122,732.312,78.794,761.160" size="28.848">W</text>
<text font="ZWOHBU+HelveticaNeueLTStd-BlkCn" bbox="78.794,732.312,87.626,761.160" size="28.848">-</text>
<text font="ZWOHBU+HelveticaNeueLTStd-BlkCn" bbox="87.626,732.312,100.106,761.160" size="28.848">9</text>
<text></text>
</textline>
Extracting Text With Slate
Tim McNamara didn’t like how obtuse and difficult PDFMiner is to use, so he wrote a wrapper around it called slate that makes it much easier to extract text from PDFs. Unfortunately, it does not appear to be Python 3 compatible. If you want to give it a try, you may need to have easy_install available to install the distribute package, like this:
easy_install distribute
I wasn’t able to get pip to install that package correctly. Once it’s installed though, you will be able to use pip to install slate:
python -m pip install slate
Note that the latest version is 0.5.2 and pip may or may not grab that version. If it does not, then you can install slate directly from GitHub:
python -m pip install git+https://github.com/timClicks/slate
Now we’re ready to write some code to extract the text from a PDF:
# slate_text_extraction.py
import slate
def extract_text_from_pdf(pdf_path):
with open(pdf_path) as fh:
document = slate.PDF(fh, password='', just_text=1)
for page in document:
print(page)
if __name__ == '__main__':
extract_text_from_pdf('w9.pdf')As you can see, to make slate parse a PDF, you just need to import slate and then create an instance of its PDF class. The PDF class is actually a subclass of Python’s list built-in, so it just returns a list/iterable of pages of text. You will also note that we can pass in a password argument if the PDF has a password set. Anyway, once the document is parsed, we just print out the text on each page.
I really like how much easier it is to use slate. Unfortunately there is almost no documentation associated with this package either. After looking through the source code, it appears that all this package supports is text extraction.
Exporting Your Data
Now that we have some text to work with, we will spend some time learning how to export that data in a variety of different formats. Specifically, we will learn how to export our text in the following ways:
Let’s get started!
Exporting to XML
The eXtensible Markup Language (XML) format is one of the most well known output and input formats. It is used widely on the internet for many different things. As we have already seen in this post, PDFMiner also supports XML as one of its outputs.
Let’s create our own XML creation tool, though. Here’s a simple example:
# xml_exporter.py
import os
import xml.etree.ElementTree as xml
from miner_text_generator import extract_text_by_page
from xml.dom import minidom
def export_as_xml(pdf_path, xml_path):
    filename = os.path.splitext(os.path.basename(pdf_path))[0]
    root = xml.Element('{filename}'.format(filename=filename))
    pages = xml.Element('Pages')
    root.append(pages)
    counter = 1
    for page in extract_text_by_page(pdf_path):
        text = xml.SubElement(pages, 'Page_{}'.format(counter))
        text.text = page[0:100]
        counter += 1
    tree = xml.ElementTree(root)
    xml_string = xml.tostring(root, 'utf-8')
    parsed_string = minidom.parseString(xml_string)
    pretty_string = parsed_string.toprettyxml(indent='  ')
    with open(xml_path, 'w') as fh:
        fh.write(pretty_string)
    #tree.write(xml_path)
if __name__ == '__main__':
    pdf_path = 'w9.pdf'
    xml_path = 'w9.xml'
    export_as_xml(pdf_path, xml_path)
This script will use Python’s built-in XML libraries, minidom and ElementTree. We also import our PDFMiner generator script that we use to grab a page of text at a time. In this example, we create our top level element which is the file name of the PDF. Then we add a Pages element underneath it. The next step is our for loop where we extract each page from the PDF and save off the information we want. Here is where you could add a special parser where you might split up the page into sentences or words and parse out more interesting information. For example, you might want only sentences with a particular name or date/timestamp. You can use Python’s Regular Expressions to find those sorts of things or just check for the existence of sub-strings in the sentence.
For this example, we just extract the first 100 characters from each page and save them off into an XML SubElement. Technically, the next bit of code could be simplified to just write out the XML. However, ElementTree doesn’t do anything to the XML to make it easy to read. It kind of ends up looking like minified JavaScript in that its just one giant block of text. So instead of writing that block of text to disk, we use minidom to “prettify” the XML with whitespace before writing it out. The result ends up looking like this:
<?xml version="1.0" ?>
<w9>
 <Pages>
 <Page_1>Form    W-9(Rev. November 2017)Department of the Treasury  Internal Refor Taxp</Page_1>
 <Page_2>Form W-9 (Rev. 11-2017)Page 2 By signing the filled-out form, you: 1. Ceou are g</Page_2>
 <Page_3>Form W-9 (Rev. 11-2017)Page 3 Criminal penalty for falsifying information. Wig cert</Page_3>
 <Page_4>Form W-9 (Rev. 11-2017)Page 4 The following chart shows types of paymen exempt from ba</Page_4>
 <Page_5>Form W-9 (Rev. 11-2017)Page 5 1. Interest, dividend, and barter exchange 1984</Page_5>
 <Page_6>Form W-9 (Rev. 11-2017)Page 6 The IRS does not initiate contacts witso, th</Page_6>
 </Pages>
</w9>
That’s pretty clean XML and it’s also easy to read. For bonus points, you could take what you learned in the PyPDF2 section and use it to extract the metadata from the PDF and add it to your XML as well.
Exporting to JSON
JavaScript Object Notation, or JSON, is a lightweight data-interchange format that is easy to read and write. Python includes a json module in its standard library that allows you to read and write JSON programmatically. Let’s take what we learned from the previous section and use that to create an exporter script that outputs JSON instead of XML:
# json_exporter.py
import json
import os
from miner_text_generator import extract_text_by_page
def export_as_json(pdf_path, json_path):
    filename = os.path.splitext(os.path.basename(pdf_path))[0]
    data = {'Filename': filename}
    data['Pages'] = []
    counter = 1
    for page in extract_text_by_page(pdf_path):
        text = page[0:100]
        page = {'Page_{}'.format(counter): text}
        data['Pages'].append(page)
        counter += 1
    with open(json_path, 'w') as fh:
        json.dump(data, fh)
if __name__ == '__main__':
    pdf_path = 'w9.pdf'
    json_path = 'w9.json'
    export_as_json(pdf_path, json_path)
Here, we import the various libraries that we need, including our PDFMiner module. Then we create a function that accepts the PDF input path and the JSON output path. JSON is basically a dictionary in Python, so we create a couple of simple top-level keys: Filename and Pages. The Pages key maps to an empty list. Next, we loop over each page of the PDF and extract the first 100 characters of each page. Then we create a dictionary with the page number as the key and the 100 characters as the value and append it to the top-level Page’s list. Finally, we write the file using the json module’s dump command.
The contents of the file ended up looking like this:
{'Filename': 'w9',
 'Pages': [{'Page_1': 'Form    W-9(Rev. November 2017)Department of the Treasury  Internal Revenue Service Request for Taxp'},
 {'Page_2': 'Form W-9 (Rev. 11-2017)Page 2 By signing the filled-out form, you: 1. Certify that the TIN you are g'},
 {'Page_3': 'Form W-9 (Rev. 11-2017)Page 3 Criminal penalty for falsifying information. Willfully falsifying cert'},
 {'Page_4': 'Form W-9 (Rev. 11-2017)Page 4 The following chart shows types of payments that may be exempt from ba'},
 {'Page_5': 'Form W-9 (Rev. 11-2017)Page 5 1. Interest, dividend, and barter exchange accounts opened before 1984'},
 {'Page_6': 'Form W-9 (Rev. 11-2017)Page 6 The IRS does not initiate contacts with taxpayers via emails. Also, th'}]}
Once again, we have some nice output that is easy to read. You could enhance this example with the PDF’s metadata as well, if you would like to. Note that the output will change depending on what you want to parse out of each page or document.
Now let’s take a quick look at how we could export to CSV.
Exporting to CSV
CSV stands for **comma separated values**. It is a pretty standard format that has been around a very long time. The nice thing about CSV is that Microsoft Excel and LibreOffice will open them up in a nice spreadsheet automatically. You can also open up CSV files in a text editor if you’d like to see the raw value.
Python has a built-in csv module that you can use to read and write CSV files. We will use it here to create a CSV from the text that we extract from the PDF. Let’s take a look at some code:
# csv_exporter.py
import csv
import os
from miner_text_generator import extract_text_by_page
def export_as_csv(pdf_path, csv_path):
    filename = os.path.splitext(os.path.basename(pdf_path))[0]
    counter = 1
    with open(csv_path, 'w') as csv_file:
        writer = csv.writer(csv_file)
        for page in extract_text_by_page(pdf_path):
            text = page[0:100]
            words = text.split()
            writer.writerow(words)
if __name__ == '__main__':
    pdf_path = 'w9.pdf'
    csv_path = 'w9.csv'
    export_as_csv(pdf_path, csv_path)
For this example, we import Python’s csv library. Otherwise, the imports are the same as the previous example. In our function, we create a CSV file handler using the CSV file path. Then we initialize a CSV writer object with that file handler as its sole argument. Next, we loop over the pages of the PDF as before. The only difference here is that we split the first 100 characters into individual words. This allows us to have some actual data to add to the CSV. If we did not do this, then each row would only have one element in it, which isn’t really a CSV file at that point. Finally, we write out our list of words to the CSV file.
This is the result I got:
Form,W-9(Rev.,November,2017)Department,of,the,Treasury,Internal,Revenue,Service,Request,for,Taxp
Form,W-9,(Rev.,11-2017)Page,2,By,signing,the,filled-out,"form,",you:,1.,Certify,that,the,TIN,you,are,g
Form,W-9,(Rev.,11-2017)Page,3,Criminal,penalty,for,falsifying,information.,Willfully,falsifying,cert
Form,W-9,(Rev.,11-2017)Page,4,The,following,chart,shows,types,of,payments,that,may,be,exempt,from,ba
Form,W-9,(Rev.,11-2017)Page,5,1.,"Interest,","dividend,",and,barter,exchange,accounts,opened,before,1984
Form,W-9,(Rev.,11-2017)Page,6,The,IRS,does,not,initiate,contacts,with,taxpayers,via,emails.,"Also,",th
I think this one is a bit harder to read than the JSON or XML examples, but it’s not too bad. Now let’s move on and look at how we might extract images from a PDF.
Extracting Images From PDFs
Unfortunately, there are no Python packages that actually do image extraction from PDFs. The closest thing I found was a project called minecart that claims to be able to do it, but only works on Python 2.7. I was not able to get it to work with the sample PDFs I had. There is an article on Ned Batchelder’s blog that talks a bit about how he was able to extract JPGs from PDFs. His code is as follows:
# Extract jpg's from pdf's. Quick and dirty.
import sys
pdf = file(sys.argv[1], "rb").read()
startmark = "\xff\xd8"
startfix = 0
endmark = "\xff\xd9"
endfix = 2
i = 0
njpg = 0
while True:
 istream = pdf.find("stream", i)
 if istream < 0:
   break
 istart = pdf.find(startmark, istream, istream+20)
 if istart < 0:
 i = istream+20
 continue
 iend = pdf.find("endstream", istart)
 if iend < 0:
 raise Exception("Didn't find end of stream!")
 iend = pdf.find(endmark, iend-20)
 if iend < 0:
 raise Exception("Didn't find end of JPG!")
 istart += startfix
 iend += endfix
 print("JPG %d from %d to %d" % (njpg, istart, iend))
 jpg = pdf[istart:iend]
 jpgfile = file("jpg%d.jpg" % njpg, "wb")
 jpgfile.write(jpg)
 jpgfile.close()
 njpg += 1
 i = iend
This also did not work for the PDFs I was using. There are some people in the comments that do claim it works for some of their PDFs and there are some examples of updated code in the comments too. Stack Overflow has variations of this code on it, some of which use PyPDF2 in some way or another. None of these worked for me either.
My recommendation is to use a tool like Poppler to extract the images. Poppler has a tool called pdfimages that you can use with Python’s subprocess module. Here’s how you could use it without Python:
pdfimages -all reportlab-sample.pdf images/prefix-jpg
Make sure that the images folder (or whatever output folder you want to create) is already created as pdfimages doesn’t create it for you.
Let’s write up a Python script that also executes this command and will make sure the output folder exists for you too:
# image_exporter.py
import os
import subprocess
def image_exporter(pdf_path, output_dir):
  if not os.path.exists(output_dir):
  os.makedirs(output_dir)
  cmd = ['pdfimages', '-all', pdf_path,
           '{}/prefix'.format(output_dir)]
  subprocess.call(cmd)
  print('Images extracted:')
  print(os.listdir(output_dir))
if __name__ == '__main__':
  pdf_path = 'reportlab-sample.pdf'
  image_exporter(pdf_path, output_dir='images')
In this example, we import the subprocess and os modules. If the output directory does not exist, we attempt to create it. Them we use subprocess’s call method to execute pdfimages. We use call because it will wait for pdfimages to finish running. You could use Popen instead, but that will basically run the process in the background. Finally, we print out a listing of the output directory to confirm that images were extracted to it.
There are some other articles on the internet that reference a library called Wand that you might also want to try. It is an ImageMagick wrapper. Also of note is that there is a Python binding to Poppler called pypoppler, although I wasn’t able to find any examples of that package that did image extraction.
Wrapping Up
We covered a lot of different information in this post. We learned about several different packages that we can use to extract text from PDFs such as PDFMiner or Slate. We also learned how to use Python’s built-in libraries to export the text to XML, JSON, and CSV. Finally, we looked at the difficult problem of exporting images from PDFs. While Python does not currently have any good libraries for this task, you can workaround that by using other tools, such as Poppler’s pdfimage utility.
—
Extracting data from PDFs using Python
When testing highly data dependent products, I find it very useful to use data published by governments. When government organizations publish data online, barring a few notable exceptions, it usually releases it as a series of PDFs. The PDF file format was not designed to hold structured data, which makes extracting data from PDFs difficult. In this post, I will show you a couple of ways to extract text and table data from PDF file using Python and write it into a CSV or Excel file.
We will take an example of US census data for the Hispanic Population for 2010. If you look at the content of the PDF, you can see that there is a lot of text data, table data, graphs, maps etc. I will extract the table data for Hispanic or Latino Origin Population by Type: 2000 and 2010 from Page 3 of the PDF file.
For achieving this, I first tried using PyPDF2 (for extracting) and PDFtables (for converting PDF tables to Excel/CSV). It did serve my requirement but PDFtables.com is paid service.
Later I came across PDFMiner and started exploring it for extracting data using its pdf2txt.py script. I liked this solution much better and I am using it for my work.
Method 1: Extract the Pages with Tables using PyPDF2 and PDFTables
When I Googled around for ‘Python read pdf’, PyPDF2 was the first tool I stumbled upon. PyPDF2 can extract data from PDF files and manipulate existing PDFs to produce a new file. After spending a little time with it, I realized PyPDF2 does not have a way to extract images, charts, or other media from PDF documents. But it can extract text and return it as a Python string. Reading a PDF document is pretty simple and straight forward. I used PdfFileReader() and PdfFileWriter() classes for reading and writing the table data.
import PyPDF2

PDFfilename = "hispanic.pdf" #filename of your PDF/directory where your PDF is stored

pfr = PyPDF2.PdfFileReader(open(PDFfilename, "rb")) #PdfFileReader object
Firstly, I installed PyPDF2 library and imported it, created an instance of the PdfFileReader Class, which stores information about the PDF (number of pages, text on pages, etc). In this PDF, the table which I need extract is in Page 3. To extract this page, I used below code:-
pg3 = pfr.getPage(2) #extract pg 2
writer = PyPDF2.PdfFileWriter() #create PdfFileWriter object

#add pages
writer.addPage(pg3)

#filename of your PDF/directory where you want your new PDF to be
NewPDFfilename = "hispanic_tables.pdf"

with open(NewPDFfilename, "wb") as outputStream: #create new PDF
    writer.write(outputStream) #write pages to new PDF
I used the .getPage() method, with the page number + 1 as the parameter (pages start at 0), on PdfFileReader object. After that, I created a PdfFileWriter object, which will eventually write a new PDF and add the pages to it. The purpose of writing this page with tables into separate pdf file is that I used PDFTables for extracting data. PDFTables puts everything (not just tables) in the PDF document into the output Excel or CSV, to avoid having a lot of junk data in the Excel I created a separate PDF with just the table that I want to extract.
PyPDF2 library extracts the text from a PDF document very nicely. The problem with this is that if there are tables in the document, the text in the tables is extracted in-line with the rest of the document text. This can be problematic because it produces sections of text that aren’t useful and look confusing (for instance, lots of numbers mashed together)
Writing the Table Data to a Excel using PDFTables
Now that I have a PDF with all of the table data that I need, I can now use PDFTables to write the table data to an Excel/CSV file. The PDFTables package extracts tables from PDF files and allows the user to convert PDF tables to formats (CSV, XLM, or XLSX). It provides us with an API key using which we can post a request to the PDFTables website to get the table extraction. You can get an API key by creating an account on the site for a free trial (PDFtables.com is paid, getting an API Key is restricted to certain pages only). With this free trial, I was able to upload this pdf and write the response to an excel. This served my purpose, but since PDFTables.com is paid I moved on exploring other tools for data extraction.
Method 2: PDFMiner for extracting text data from PDFs
I came across a great Python-based solution to extract the text from a PDF is PDFMiner. PDFMiner has two command-line scripts namely pdf2txt.py (to extract text and images) and dumpdf.py (find objects and their coordinates). I used pdf2txt.py script to extract the pdf content to HTML format using below command.
pdf2txt.py -O myoutput -o myoutput/hispanic.html -t html -p 3 hispanic.pdf
Below is list of options which can be used with pdf2txt.py
Options:
The above command can be used to convert a PDF to HTML or XML. After installing PDFMiner, cd into the directory where the PDF file is located and ran the above command. The resulting file will be ‘hispanic.html’ which has the 3rd page from the PDF. Reading data from HTML can be done using Beautiful Soup. It is a powerful Python library for extracting data from XML and HTML files. I used BeautifulSoup for reading and extracting the data from hispanic.html. You can refer to my previous post on Data scraping using python for extracting table data from html and writing into a csv file. I wrote a quick script that will extract table data from web page using Wikipedia module and BeautifulSoup.
In this way, I used PDFMiner and PyPDF2 to extract the data, but you’ll still have to make a choice when deciding which to use and learn. Both libraries are in active development and the developers are dedicated to providing good code. There are several tools you can use to get what you need from them, and Python enables to get inside and scrape, split, merge, delete, and crop just about whatever you find.
In this post, I tried to showcase different approaches with few code snippets which I implemented in our requirement for extracting table data from PDF file by providing. I hope you will like it!
If you are a startup finding it hard to hire technical QA engineers, learn more about Qxf2 Services.
References:-
1) Manipulating PDFs with python and PyPDF2
2) Working with pdf file in python
3) Different PDF tools to extract text and data from pdfs
—
Announcing Camelot, a Python Library to Extract Tabular Data from PDFs
PDF was born out of The Camelot Project to create “a universal way to communicate documents across a wide variety of machine configurations, operating systems and communication networks”. Basically, the goal was to make documents viewable on any display and printable on any modern printer. PDF was built on top of PostScript (a page description language), which had already solved this “view and print anywhere” problem. PDF encapsulates the components required to create a “view and print anywhere” document. These include characters, fonts, graphics and images.
A PDF file defines instructions to place characters (and other components) at precise x,y coordinates relative to the bottom-left corner of the page. Words are simulated by placing some characters closer than others. Similarly, spaces are simulated by placing words relatively far apart. How are tables simulated then? You guessed it correctly — by placing words as they would appear in a spreadsheet.
The PDF format has no internal representation of a table structure, which makes it difficult to extract tables for analysis. Sadly, a lot of open data is stored in PDFs, which was not designed for tabular data in the first place!
Camelot: PDF table extraction for humans
Today, we’re pleased to announce the release of Camelot, a Python library and command-line tool that makes it easy for anyone to extract data tables trapped inside PDF files! You can check out the documentation at Read the Docs and follow the development on GitHub.
How to install Camelot
Installation is easy! After installing the dependencies, you can install Camelot using pip (the recommended tool for installing Python packages):
$ pip install camelot-py
How to use Camelot
Extracting tables from a PDF using Camelot is very simple. Here’s how you do it. (Here’s the PDF used in the following example.)
>>> import camelot
>>> tables = camelot.read_pdf('foo.pdf')
>>> tables
<TableList n=1>
>>> tables.export('foo.csv', f='csv', compress=True) # json, excel, html
>>> tables[0]
<Table shape=(7, 7)>
>>> tables[0].parsing_report
{
    'accuracy': 99.02,
    'whitespace': 12.24,
    'order': 1,
    'page': 1
}
>>> tables[0].to_csv('foo.csv') # to_json, to_excel, to_html
>>> tables[0].df # get a pandas DataFrame!
Why use Camelot?
Okay, but why another PDF table extraction library?
TL;DR: Total control for better table extraction
Many people use open (Tabula, pdf-table-extract) and closed-source (smallpdf, pdftables) tools to extract tables from PDFs. But they either give a nice output or fail miserably. There is no in between. This is not helpful since everything in the real world, including PDF table extraction, is fuzzy. This leads to the creation of ad-hoc table extraction scripts for each type of PDF table.
We created Camelot to offer users complete control over table extraction. If you can’t get your desired output with the default settings, you can tweak them and get the job done!
You can check out a comparison of Camelot’s output with other open-source PDF table extraction libraries.
The longer read
We’ve often needed to extract data trapped inside PDFs.
The first tool that we tried was Tabula, which has nice user and command-line interfaces, but it either worked perfectly or failed miserably. When it failed, it was difficult to tweak the settings — such as the image thresholding parameters, which influence table detection and can lead to a better output.
We also tried closed-source tools like smallpdf and pdftables, which worked slightly better than Tabula. But then again, they also didn’t allow tweaking and cost money. (We wrote a blog post about how we went about extracting tables from PDFs back in 2015, titled “PDF is evil”.)
When these full-blown PDF table extraction tools didn’t work, we tried pdftotext (an open-source command-line utility). pdftotext extracts text from a PDF while preserving the layout, using spaces. After getting the text, we had to write Python scripts with complicated regexes (regular expressions) to convert the text into tables. This wasn’t scalable, since we had to change the regexs for each new table layout.
We clearly needed a tweakable PDF table extraction tool, so we started developing one in December 2015. We started with the idea of giving the tool back to the community, which had given us so many open-source tools to work with.
We knew that Tabula classifies PDF tables into two classes. It has two methods to extract these different classes: Lattice (to extract tables with clearly defined lines between cells) and Stream (to extract tables with spaces between cells). We named Camelot’s table extraction flavors, Lattice and Stream, after Tabula’s methods.
For Lattice, Tabula uses Hough Transform, an image processing technique to detect lines. Since we wanted to use Python, OpenCV was the obvious choice to do image processing. However, OpenCV’s Hough Line Transform returned only line equations. After more exploration, we settled on morphological transformations, which gave the exact line segments. From here, representing the table trapped inside a PDF was straightforward.
To get more information on how Lattice and Stream work in Camelot, check out the “How It Works” section of the documentation.
How we use Camelot
We’ve battle tested Camelot by using it in a variety of projects, both for one-off and automated table extraction.
Earlier this year, we developed our UN SDG Solution to help organizations track and measure their contribution to Agenda 2030. For India, we identified open data sources (primarily PDF reports) for each of the 17 Sustainable Development Goals. For example, one of our sources for Goal 3 (“Good Health and Well-Being for People”) is the National Family Health Survey (NFHS) report released by IIPS. To get data from these PDF sources, we created an internal web interface built on top of Camelot, where our data analysts could upload PDF reports and extract tables in their preferred format.
Note: We became finalists for the UN SDG Action Awards in February 2018.
We also set up an ETL workflow using Apache Airflow to track disease outbreaks in India. The workflow scrapes the Integrated Disease Surveillance Programme (IDSP) website for weekly PDFs of disease outbreak data, and then it extracts tables from the PDFs using Camelot, sends alerts to our team, and loads the data into a data warehouse.
To infinity and beyond!
Camelot has some limitations. (We’re developing solutions!) Here are a couple of them:
You can check out the GitHub repository for more information.
You can help too — every contribution counts! Check out the Contributor’s Guide for guidelines around contributing code, documentation or tests, reporting issues and proposing enhancements. You can also head to the issue tracker and look for issues labeled “help wanted” and “good first issue”.
We urge organizations to release open data in a “data friendly” format like the CSV. But while tables are trapped inside PDF files, there’s Camelot :)
—
Exporting Data from PDFs with Python
PDFMiner
Github : https://github.com/euske/pdfminer - PyPI : https://pypi.python.org/pypi/pdfminer - Webpage : https://euske.github.io/pdfminer
PDFMiner is not compatible with Python 3.
Fortunately, there is a fork of PDFMiner called PDFMiner.six that works exactly the same : https://github.com/pdfminer/pdfminer.six
The directions for installing PDFMiner are out-dated at best. You can actually use pip to install it:
python -m pip install pdfminer
If you want to install PDFMiner for Python 3 (which is what you should probably be doing), then you have to do the install like this:
python -m pip install pdfminer.six
The documentation on PDFMiner is rather poor at best. You will most likely need to use Google and StackOverflow to figure out how to use PDFMiner effectively outside of what is covered in this chapter.
Extracting all the text
The PDFMiner package offers a couple of different methods that you can do this. We will look at some of the programmatic methods first. Let’s try reading all the text out of an Internal Revenue Service W9 form. You can get a copy here: https://www.irs.gov/pub/irs-pdf/fw9.pdf
Once you had the PDF properly saved off, we can look at the code:
import io
from pdfminer.converter import TextConverter
from pdfminer.pdfinterp import PDFPageInterpreter
from pdfminer.pdfinterp import PDFResourceManager
from pdfminer.pdfpage import PDFPage

def extract_text_from_pdf(pdf_path):
    resource_manager = PDFResourceManager()
    fake_file_handle = io.StringIO()
    converter = TextConverter(resource_manager, fake_file_handle)
    page_interpreter = PDFPageInterpreter(resource_manager, converter)

    with open(pdf_path, 'rb') as fh:
        for page in PDFPage.get_pages(fh,
                                      caching=True,
                                      check_extractable=True):
            page_interpreter.process_page(page)

        text = fake_file_handle.getvalue()

    # close open handles
    converter.close()
    fake_file_handle.close()

    if text:
        return text

if __name__ == '__main__':
    print(extract_text_from_pdf('w9.pdf'))
The PDFMiner package tends to be a bit verbose when you use it directly. Here we import various bits and pieces from various parts of PDFMiner. Since there is no documentation of any of these classes and no docstrings either, I won’t explain what they do in depth. Feel free to dig into the source code yourself if you’re really curious. However, I think we can kind of follow along with the code.
The first thing we do is create a resource manager instance. Then we create a file-like object via Python’s io module. If you are using Python 2, then you will want to use the StringIO module. Our next step is to create a converter. In this case, we choose the TextConverter, however you could also use an HTMLConverter or an XMLConverter if you wanted to. Finally we create a PDF interpreter object that will take our resource manager and converter objects and extract the text.
The last step is to open the PDF and loop through each page. At the end, we grab all the text, close the various handlers and print out the text to stdout.
Extracting text by page
Frankly grabbing all the text from a multi-page document isn’t all that useful. Usually you will want to do work on smaller subsets of the document instead. So let’s rewrite the code so it extracts text on a page-by-page basis. This will allow us to examine the text a page at a time:
# miner_text_generator.py

import io
from pdfminer.converter import TextConverter
from pdfminer.pdfinterp import PDFPageInterpreter
from pdfminer.pdfinterp import PDFResourceManager
from pdfminer.pdfpage import PDFPage

def extract_text_by_page(pdf_path):
    with open(pdf_path, 'rb') as fh:
        for page in PDFPage.get_pages(fh, caching=True, check_extractable=True):
            resource_manager = PDFResourceManager()
            fake_file_handle = io.StringIO()
            converter = TextConverter(resource_manager, fake_file_handle)
            page_interpreter = PDFPageInterpreter(resource_manager, converter)
            page_interpreter.process_page(page)

            text = fake_file_handle.getvalue()
            yield text

            # close open handles
            converter.close()
            fake_file_handle.close()

def extract_text(pdf_path):
    for page in extract_text_by_page(pdf_path):
        print(page)
        print()

if __name__ == '__main__':
    print(extract_text('w9.pdf'))
In this example, we create a generator function that yields the text for each page. The extract_text function prints out the text of each page. This is where we could add some parsing logic to parse out what we want. Or we could just save the text (or HTML or XML) off as individual files for future parsing.
You will note that the text may not be in the order you expect. So you will definitely need to figure out the best way to parse out the text that you are interested in.
The nice thing about PDFMiner is that you can already “export” the PDF as text, HTML or XML.
You can also use PDFMiner’s command line tools, pdf2txt.py and dumppdf.py to do the exporting for you if you don’t want to try to figure out PDFMiner yourself. According to the source code of pdf2txt.py, it can be used to export a PDF as plain text, html, xml or “tags”.
Exporting Text via pdf2txt.py
The pdf2txt.py command line tool that comes with PDFMiner will extract text from a PDF file and print it out to stdout by default. It will not recognize text that is images as PDFMiner does not support optical character recognition (OCR). Let’s try the simplest method of using it which is just passing it the path to a PDF file. We will use the w9.pdf. Open up a terminal and navigate to the location that you have saved that PDF or modify the command below to point to that file:
pdf2txt.py w9.pdf
If you run this, it will print out all the text to stdout. You can also make pdf2txt.py write the text to file as text, HTML, XML or “tagged PDF”. The XML format will give to the most information about the PDF as it contains the location of each letter in the document as well as font information. HTML is not recommended as the markup pdf2txt generates tends to be ugly. Here’s how you can get different formats output:
pdf2txt.py -o w9.html w9.pdf
pdf2txt.py -o w9.xml w9.pdf
The first command will create an HTML document while the second will create an XML document. Here is a sceenshot of what I got when I did the HTML conversion:

As you can see, the end result looks a bit off, but it’s not too bad. The XML it outputs is extremely verbose, so I can’t reproduce it all here. However here is a snippet to give you an idea of what it looks like:
<pages>
   <page id="1" bbox="0.000,0.000,611.976,791.968" rotate="0">
      <textbox id="0" bbox="36.000,732.312,100.106,761.160">
	<textline bbox="36.000,732.312,100.106,761.160">
	   <text font="JYMPLA+HelveticaNeueLTStd-Roman" bbox="36.000,736.334,40.018,744.496" size="8.162">F</text>
	   <text font="JYMPLA+HelveticaNeueLTStd-Roman" bbox="40.018,736.334,44.036,744.496" size="8.162">o</text>
	   <text font="JYMPLA+HelveticaNeueLTStd-Roman" bbox="44.036,736.334,46.367,744.496" size="8.162">r</text>
	   <text font="JYMPLA+HelveticaNeueLTStd-Roman" bbox="46.367,736.334,52.338,744.496" size="8.162">m</text>
	   <text font="JYMPLA+HelveticaNeueLTStd-Roman" bbox="52.338,736.334,54.284,744.496" size="8.162"> </text>
	   <text font="JYMPLA+HelveticaNeueLTStd-Roman" bbox="54.284,736.334,56.230,744.496" size="8.162"> </text>
	   <text font="JYMPLA+HelveticaNeueLTStd-Roman" bbox="56.230,736.334,58.176,744.496" size="8.162"> </text>
           <text font="JYMPLA+HelveticaNeueLTStd-Roman" bbox="58.176,736.334,60.122,744.496" size="8.162"> </text>
	   <text font="ZWOHBU+HelveticaNeueLTStd-BlkCn" bbox="60.122,732.312,78.794,761.160" size="28.848">W</text>
	   <text font="ZWOHBU+HelveticaNeueLTStd-BlkCn" bbox="78.794,732.312,87.626,761.160" size="28.848">-</text>
	   <text font="ZWOHBU+HelveticaNeueLTStd-BlkCn" bbox="87.626,732.312,100.106,761.160" size="28.848">9</text>
	   <text></text>
	</textline>
Extracting Text with Slate
Tim McNamara didn’t like how obtuse and difficult PDFMiner is to use, so he wrote a wrapper around it called slate that makes it much easier to extract text from PDFs. Unfortunately, it does not appear to be Python 3 compatible. If you want to give it a try, you may need to have easy_install available to install the distribute package, like this:
easy_install distribute
I wasn’t able to get pip to install that package correctly. Once it’s installed though, you will be able to use pip to install slate:
python -m pip install slate
Note that the latest version is 0.5.2 and pip may or may not grab that version. If it does not, then you can install slate directly from Github:
python -m pip install git+https://github.com/timClicks/slate
Now we’re ready to write some code to extract the text from a PDF:
# slate_text_extraction.py

import slate

def extract_text_from_pdf(pdf_path):
    with open(pdf_path) as fh:
        document = slate.PDF(fh, password='', just_text=1)

    for page in document:
        print(page)

if __name__ == '__main__':
    extract_text_from_pdf('w9.pdf')
As you can see, to make slate parse a PDF, you just need to import slate and then create an instance of its PDF class. The PDF class is actually a subclass of Python’s list builtin, so it just returns a list / iterable of pages of text. You will also note that we can pass in a password argument if the PDF has a password set. Anyway, once the document is parsed, we just print out the text on each page.
I really like how much easier it is to use slate. Unfortunately there is almost no documentation associated with this package either. After looking through the source code, it appears that all this package supports is text extraction.
Exporting Your Data
Now that we have some text to work with, we will spend some time learning how to export that data in a variety of different formats. Specifically, we will learn how to export our text in the following ways:
Let’s get started!
Exporting to XML
The eXtensible Markup Language (XML) format is one of the most well known output and input formats. It is used widely on the internet for many different things. As we have already seen in this chapter, PDFMiner also supports XML as one of its outputs.
Let’s create our own XML creation tool though. Here’s a simple example:
# xml_exporter.py

import os
import xml.etree.ElementTree as xml

from miner_text_generator import extract_text_by_page
from xml.dom import minidom

def export_as_xml(pdf_path, xml_path):
    filename = os.path.splitext(os.path.basename(pdf_path))[0]
    root = xml.Element('{filename}'.format(filename=filename))
    pages = xml.Element('Pages')
    root.append(pages)

    counter = 1
    for page in extract_text_by_page(pdf_path):
        text = xml.SubElement(pages, 'Page_{}'.format(counter))
        text.text = page[0:100]
        counter += 1

    tree = xml.ElementTree(root)
    xml_string = xml.tostring(root, 'utf-8')
    parsed_string = minidom.parseString(xml_string)
    pretty_string = parsed_string.toprettyxml(indent='  ')

    with open(xml_path, 'w') as fh:
        fh.write(pretty_string)
    #tree.write(xml_path)

if __name__ == '__main__':
    pdf_path = 'w9.pdf'
    xml_path = 'w9.xml'
    export_as_xml(pdf_path, xml_path)
This script will use Python’s built-in XML libraries, minidom and ElementTree. We also import our PDFMiner generator script that we use to grab a page of text at a time. In this example, we create our top level element which is the file name of the PDF. Then we add a Pages element underneath it. The next step is our for loop where we extract each page from the PDF and save off the information we want. Here is where you could add a special parser where you might split up the page into sentences or words and parse out more interesting information. For example, you might want only sentences with a particular name or date / timestamp. You can use Python’s Regular Expressions to find those sorts of things or just check for the existence of sub-strings in the sentence.
For this example, we just extract the first 100 characters from each page and save them off into an XML SubElement. Technically the next bit of code could be simplified to just write out the XML. However, ElementTree doesn’t do anything to the XML to make it easy to read. It kind of ends up looking like minified javascript in that its just one giant block of text. So instead of writing that block of text to disk, we use minidom to “prettify” the XML with whitespace before writing it out. The result ends up looking like this:
<?xml version="1.0" ?>
<w9>
  <Pages>
    <Page_1>Form    W-9(Rev. November 2017)Department of the Treasury  Internal Revenue Service Request for Taxp</Page_1>
    <Page_2>Form W-9 (Rev. 11-2017)Page 2 By signing the filled-out form, you: 1. Certify that the TIN you are g</Page_2>
    <Page_3>Form W-9 (Rev. 11-2017)Page 3 Criminal penalty for falsifying information. Willfully falsifying cert</Page_3>
    <Page_4>Form W-9 (Rev. 11-2017)Page 4 The following chart shows types of payments that may be exempt from ba</Page_4>
    <Page_5>Form W-9 (Rev. 11-2017)Page 5 1. Interest, dividend, and barter exchange accounts opened before 1984</Page_5>
    <Page_6>Form W-9 (Rev. 11-2017)Page 6 The IRS does not initiate contacts with taxpayers via emails. Also, th</Page_6>
  </Pages>
</w9>
That’s pretty clean XML and it’s also easy to read. For bonus points, you could take what you learned in the PyPDF2 chapter and use it to extract the metadata from the PDF and add it to your XML as well.
Exporting to JSON
JavaScript Object Notation or JSON is a lightweight data-interchange format that is easy to read and write. Python includes a json module in its standard library that allows you to read and write JSON programmatically. Let’s take what we learned from the previous section and use that to create an exporter script that outputs JSON instead of XML:
# json_exporter.py

import json
import os

from miner_text_generator import extract_text_by_page

def export_as_json(pdf_path, json_path):
    filename = os.path.splitext(os.path.basename(pdf_path))[0]
    data = {'Filename': filename}
    data['Pages'] = []

    counter = 1
    for page in extract_text_by_page(pdf_path):
        text = page[0:100]
        page = {'Page_{}'.format(counter): text}
        data['Pages'].append(page)
        counter += 1

    with open(json_path, 'w') as fh:
        json.dump(data, fh)

if __name__ == '__main__':
    pdf_path = 'w9.pdf'
    json_path = 'w9.json'
    export_as_json(pdf_path, json_path)
Here we import the various libraries that we need including our PDFMiner module. Then we create a function that accepts the PDF input path and the JSON output path. JSON is basically a dictionary in Python, so we create a couple of simple top-level keys: Filename and Pages. The Pages key maps to an empty list. Next we loop over each page of the PDF and extract the first 100 characters of each page. Then we create a dictionary with the page number as the key and the 100 characters as the value and append it to the top-level Page’s list. Finally we write the file using the json module’s dump command.
The contents of the file ended up looking like this:
{'Filename': 'w9',
 'Pages': [{'Page_1': 'Form    W-9(Rev. November 2017)Department of the Treasury  Internal Revenue Service Request for Taxp'},
           {'Page_2': 'Form W-9 (Rev. 11-2017)Page 2 By signing the filled-out form, you: 1. Certify that the TIN you are g'},
           {'Page_3': 'Form W-9 (Rev. 11-2017)Page 3 Criminal penalty for falsifying information. Willfully falsifying cert'},
           {'Page_4': 'Form W-9 (Rev. 11-2017)Page 4 The following chart shows types of payments that may be exempt from ba'},
           {'Page_5': 'Form W-9 (Rev. 11-2017)Page 5 1. Interest, dividend, and barter exchange accounts opened before 1984'},
           {'Page_6': 'Form W-9 (Rev. 11-2017)Page 6 The IRS does not initiate contacts with taxpayers via emails. Also, th'}]}
Once again, we have some nice output that is easy to read. You could enhance this example with the PDF’s metadata as well, if you would like to. Note that the output will change depending on what you want to parse out of each page or document.
Now let’s take a quick look at how we could export to CSV.
Exporting to CSV
CSV stands for **comma separated values**. It is a pretty standard format that has been around a very long time. The nice thing about CSV is that Microsoft Excel and LibreOffice will open them up in a nice spreadsheet automatically. You can also open up CSV files in a text editor if you’d like to see the raw value.
Python has a built-in csv module that you can use to read and write CSV files. We will use it here to create a CSV from the text that we extract from the PDF. Let’s take a look at some code:
# csv_exporter.py

import csv
import os
from miner_text_generator import extract_text_by_page

def export_as_csv(pdf_path, csv_path):
    filename = os.path.splitext(os.path.basename(pdf_path))[0]

    counter = 1
    with open(csv_path, 'w') as csv_file:
        writer = csv.writer(csv_file)
        for page in extract_text_by_page(pdf_path):
            text = page[0:100]
            words = text.split()
            writer.writerow(words)

if __name__ == '__main__':
    pdf_path = 'w9.pdf'
    csv_path = 'w9.csv'
    export_as_csv(pdf_path, csv_path)
For this example, we import Python’s csv library. Otherwise the imports are the same as the previous example. In our function, we create a CSV file handler using the CSV file path. Then we initialize a CSV writer object with that file handler as its sole argument. Next we loop over the pages of the PDF as before. The only difference here is that we split the first 100 characters into individual words. This allows us to have some actual data to add to the CSV. If we did not do this, then each row would only have one element in it, which isn’t really a CSV file at that point. Finally we write out our list of words to the CSV file.
This is the result I got:
Form,W-9(Rev.,November,2017)Department,of,the,Treasury,Internal,Revenue,Service,Request,for,Taxp
Form,W-9,(Rev.,11-2017)Page,2,By,signing,the,filled-out,"form,",you:,1.,Certify,that,the,TIN,you,are,g
Form,W-9,(Rev.,11-2017)Page,3,Criminal,penalty,for,falsifying,information.,Willfully,falsifying,cert
Form,W-9,(Rev.,11-2017)Page,4,The,following,chart,shows,types,of,payments,that,may,be,exempt,from,ba
Form,W-9,(Rev.,11-2017)Page,5,1.,"Interest,","dividend,",and,barter,exchange,accounts,opened,before,1984
Form,W-9,(Rev.,11-2017)Page,6,The,IRS,does,not,initiate,contacts,with,taxpayers,via,emails.,"Also,",th
I think this one is a bit harder to read than the JSON or XML examples, but it’s not too bad. Now let’s move on and look at how we might extract images from a PDF.
Extracting Images from PDFs
Unfortunately, there are no Python packages that actually do image extraction from PDFs. The closest thing I found was a project called minecart that claims to be able to do it, but only works on Python 2.7. I was not able to get it to work with the sample PDFs I had. There is an article on Ned Batchelder’s blog that talks a bit about how he was able to extract JPGs from PDFs. His code is as follows:
# Extract jpg's from pdf's. Quick and dirty.
import sys

pdf = file(sys.argv[1], "rb").read()

startmark = "\xff\xd8"
startfix = 0
endmark = "\xff\xd9"
endfix = 2
i = 0

njpg = 0
while True:
    istream = pdf.find("stream", i)
    if istream < 0:
        break
    istart = pdf.find(startmark, istream, istream+20)
    if istart < 0:
        i = istream+20
        continue
    iend = pdf.find("endstream", istart)
    if iend < 0:
        raise Exception("Didn't find end of stream!")
    iend = pdf.find(endmark, iend-20)
    if iend < 0:
        raise Exception("Didn't find end of JPG!")

    istart += startfix
    iend += endfix
    print("JPG %d from %d to %d" % (njpg, istart, iend))
    jpg = pdf[istart:iend]
    jpgfile = file("jpg%d.jpg" % njpg, "wb")
    jpgfile.write(jpg)
    jpgfile.close()

    njpg += 1
    i = iend
This also did not work for the PDFs I was using. There are some people in the comments that do claim it works for some of their PDFs and there are some examples of updated code in the comments too. StackOverflow has variations of this code on it, some of which use PyPDF2 in some way or another. None of these worked for me either.
My recommendation is to use a tool like Poppler to extract the images. Poppler has a tool called pdfimages that you can use with Python’s subprocess module. Here’s how you could use it without Python:
pdfimages -all reportlab-sample.pdf images/prefix-jpg
Make sure that the images folder (or whatever output folder you want to create) is already created as pdfimages doesn’t create it for you.
Let’s write up a Python script that also executes this command and will make sure the output folder exists for you too:
# image_exporter.py

import os
import subprocess

def image_exporter(pdf_path, output_dir):
    if not os.path.exists(output_dir):
        os.makedirs(output_dir)

    cmd = ['pdfimages', '-all', pdf_path,
           '{}/prefix'.format(output_dir)]
    subprocess.call(cmd)
    print('Images extracted:')
    print(os.listdir(output_dir))

if __name__ == '__main__':
    pdf_path = 'reportlab-sample.pdf'
    image_exporter(pdf_path, output_dir='images')
In thie example, we import the subprocess and os modules. If the output directory does not exist, we attempt to create it. Them we use subprocess’s call method to execute pdfimages. We use call because it will wait for pdfimages to finish running. You could use Popen instead, but that will basically run the process in the background. Finaly we print out a listing of the output directory to confirm that images were extracted to it.
There are some other articles on the internet that reference a library called Wand that you might also want to try. It is an ImageMagick wrapper. Also of note is that there is a Python binding to Poppler called pypoppler, although I wasn’t able to find any examples of that package that did image extraction.
Wrapping Up
We covered a lot of different information in this chapter. You learned about several different packages that we can use to extract text from PDFs such as PDFMiner or Slate. We also learned how to use Python’s built-in libraries to export the text to XML, JSON and CSV. Finally we looked at the difficult problem of exporting images from PDFs. While Python does not currently have any good libraries for this task, you can workaround that by using other tools, such as Poppler’s pdfimage utility.
Related Reading
—
Data-scraping PDF-parsing python bot
As easy as it may seem, getting properly formatted relevant data is never that easy. This is especially true for businesses who send reports as PDFs. In my case, our cotton gin’s website is designed to run reports on loads, quality, etc… Once you run the report it looks like this:

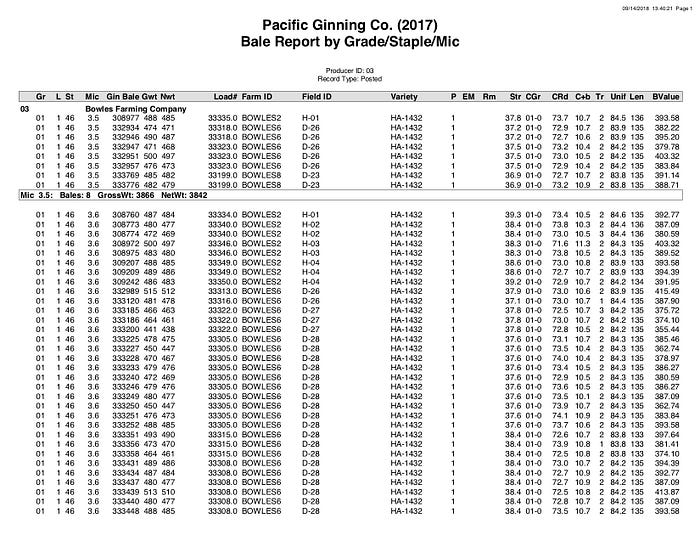
Example quality report
There are a few problems with this when you are talking about data.
So what’s the solution?
bots
A python bot to be more specific. There are a few python libraries that make this data scraping much easier. Those libraries are selenium and tabula. Selenium is a webpage automation driver in which you can tell it to click on certain things and enter text. Tabula is pdf table parser that has python bindings.
To start, install tabula and selenium with pip
pip install tabula-py
pip install -U selenium
First off, yo need to have a bot navigate your website something like this.
Selenium controlled bot
This process is surprisingly simple to accomplish in selenium.
from selenium.webdriver.common.desired_capabilities import DesiredCapabilities
from selenium.webdriver.common.action_chains import ActionChains
from selenium.webdriver.support.ui import WebDriverWait
from selenium.webdriver.support.ui import Select
from selenium.webdriver.common.keys import Keys
from selenium import webdriver
from time import sleep
import pandas as pd
import tabula
import time
import osoptions = webdriver.ChromeOptions()
download_folder = "reports"profile = {"plugins.plugins_list": [{"enabled": False,
                                     "name": "Chrome PDF Viewer"}],
           "download.default_directory": download_folder,
           "download.extensions_to_open": ""}options.add_experimental_option("prefs", profile)
driver = webdriver.Chrome(chrome_options = options)
driver.get("http://cottonhost.com/96726/")
actions = ActionChains(driver)# Log in
element = driver.find_element_by_name("LOGINBUTTON").click();# Filter to report
elem2 = driver.find_element_by_name('PRODID').send_keys("login")
elem3 = driver.find_element_by_name('PRODPASS').send_keys("password")
element = driver.find_element_by_name("LOGINBUTTON").click();
time.sleep(1);
s2= Select(driver.find_element_by_xpath("/html/body/form/table/tbody/tr[3]/td[2]/select")).select_by_value('PRODLOADRPT')
s2= Select(driver.find_element_by_xpath("/html/body/form/table/tbody/tr[4]/td[2]/select")).select_by_value('W2017')
filter = driver.find_element_by_xpath("/html/body/form/input[1]").click();
time.sleep(1);
# Run Report
reportit = driver.find_element_by_xpath("/html/body/form[@id='FILTERS']/input[10]").click();
driver.switch_to_frame(driver.find_element_by_tag_name("iframe"))
pdf = driver.find_element_by_xpath("html/body/object[@type='application/pdf']");
# print (pdf);
print (pdf.get_attribute("data"))
driver.get(pdf.get_attribute("data"))
time.sleep(4);
driver.close()
Selenium
Although this may seem complex, at it’s core it is pretty simple. With selenium there are a few actions: navigating to a website, clicking, entering text, as well as reading from parts of a website. The profile setup at the top is just to set chrome so it automatically downloads pdfs without viewing them and it downloads into the download_folder.
From there, you create a driver which is just the object that drives chrome. A driver.get("http:/mywebsite.com") will navigate to the website you pass. Once on a website you can navigate in a variety of ways documented here.
find_element_by_id
find_element_by_name
find_element_by_xpath
find_element_by_tag_name
find_element_by_link_text
find_element_by_class_name
find_element_by_css_selector
find_element_by_partial_link_text
Once you have defined driver.find_element_by_method(‘identifier’) then you can add an action on the end such as .click() or .send_keys("hello world") and with these actions you can easily log into a website and navigate. Once you have navigated to your PDF, it should automatically download because of the profile that was set up. From there you can close the driver with driver.close() which will close the chrome window.
Tabula
Now that the hard part is done and the pdf is downloaded, tabula is extremely easy to operate. The basic idea behind tabula is that either it auto-predicts where columns are (not ideal) or you can set a bounding box and place the columns. From there tabula takes over and extracts the table as well as any other information that got caught in the table. Here is the command for running tabula:
tabula.convert_into("report.pd"), "report.csv", output_format="csv",area=(72, 42, 590, 755),guess = False, options=" --pages all --columns 35,55,71,89,115,159,180.2,200,271,322,379,487,520,593,618,647,671,687,710,732,773")This command will read the pdf and is set to go through all pages and output a csv. To set the columns, you need the guess = False and using the --columns command with the location of the columns in points. The area can also be set with the area=(pixel location from top, pixel location from left, bottom of table pixels from top of page, right of table pixels from left of page) then when you run this, it spits out a perfect csv!
Table that tabula extracted
Here’s the script I have to go through the folder reports and convert the PDFs to csvs
for filename in os.listdir('reports'):
        if filename.endswith(".PDF"):
            print(filename)
            filestring = str(filename)
            filecsv = filestring[:-4]+'.csv'
            tabula.convert_into(os.path.join(download_folder,
filename), filecsv, output_format="csv",area=(72, 42, 590, 755),guess = False,options="--pages all  --columns 35,55,71,89,115,159,180.2,200,271,322,379,487,520,593,618,647,671,687,710,732,773")
I mean it’s not bad, but it just needs a little cleaning. After extracting the table, I just have sqlalchemy push it to my pgsql database. In the database I just have a trigger function to remove rows that don’t follow the Farm ID column where values are BOWLES(somevalue). This allows me to get the data cleaned up for reporting. So once the data ends up in my database, it looks something like this:
Data in database
Note: Two different reports were used in this, however the process is similar for any report.
LIENS
https://pythonhosted.org/PyPDF2
—
—