-
PYTHON > faire cohabiter plusieurs versions après un upgrade
Tout d’abord, connaitre sa version actuelle :
python3 -V
Python 3.6.7
>NOTE: Some comments below have warned that using
update-alternativesto switch from python 3.6 to python 3.7 will cause problems for some (Ubuntu Desktop) GUI applications that are linked to python 3.6. This guide is targeted at non-graphical ubuntu servers and works great as far as I’ve tested.You can still install and use python 3.7 on Ubuntu Desktop machine just skip the update-alternatives steps below. To use 3.7 instead of 3.6 just execute >python3.7 directly, create a virtualenv or use pipenv.
Installer Python 3.7 et le configurer en tant que default
sudo apt-get install python3.7
>Add python3.6 & python3.7 to update-alternatives
sudo update-alternatives --install /usr/bin/python3 python3 /usr/bin/python3.6 1
sudo update-alternatives --install /usr/bin/python3 python3 /usr/bin/python3.7 2
>Update python3 to point to python3.7
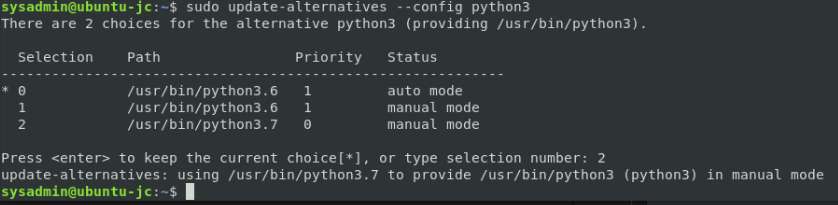
sudo update-alternatives --config python3
Enter 2 for python3.7
>Test the version of python
python3 -V
Python 3.7.1
Now you should have the latest stable version of python running on your Ubuntu linux server. Leave a comment below and checkout my other linux tutorials.
DigitalOcean offers one-click deployment of popular applications such as WordPress, Django, MongoDB, Docker, and even preconfigured Kubernetes Clusters. Deploy your next app in seconds.
Man you’re awesome. Thank you for this. I’m new to Ubuntu and feel like posts like these are invaluable to me. I tried installing with instructions from python’s site and kept getting errors. Maybe because of the version number? I don’t know, this worked though and I’m grateful for it.
After updating python3 to point to python3.7, I am getting ModuleNotFoundError using pip3, how should I also install pip3 for python3.7?
If you’ve already “broken” your native terminal by setting your update-alternatives to 3.7, try this:
-Ctrl-Alt-F1 (this will switch you into the virtual console)
-Plug in your system username and password
-Enter the following: sudo update-alternatives –config python3
-Select the option 1, for python 3.6
-Ctrl-alt-F7 to return back to the GUI
Your native terminal should work after this—
Travailler avec plusieurs versions de Python installés en parallèle ?
utiliser les commandes Python de la version souhaitée en combinaison avec l’option
-mpermet de lancer la version appropriée depip:python2 -m pip install SomePackage # default Python 2 python2.7 -m pip install SomePackage # specifically Python 2.7 python3 -m pip install SomePackage # default Python 3 python3.4 -m pip install SomePackage # specifically Python 3.4
Les versions appropriées des commandes
pippeuvent aussi être disponibles.Sous Windows, utilisez le lanceur Python
pyen combinaison avec l’option-m:py -2 -m pip install SomePackage # default Python 2 py -2.7 -m pip install SomePackage # specifically Python 2.7 py -3 -m pip install SomePackage # default Python 3 py -3.4 -m pip install SomePackage # specifically Python 3.4
Les problèmes d’installation typiques
Dans Linux, une installation de Python sera généralement inclue dans le cadre de la distribution. Installer dans cette installation de Python nécessite un accès root sur le système, et peut interférer avec le fonctionnement du gestionnaire de paquets du système et d’autres composants du système si un composant est mis à jour de façon inattendue en utilisant
pip.Sur de tels systèmes, il est souvent préférable d’utiliser un environnement virtuel ou une installation par l’utilisateur lors de l’installation des paquets avec
pip.Pip n’est pas installé
Il est possible que
pipne soit pas installé par défaut. Une solution est :python -m ensurepip --default-pip
Voir aussi installing pip.
—