-
NGINX
rendre NGINX plus sécurisé
--Update Regularly: Utiliser la dernière version de NGINX point de vue sécurité.
--Minimum Configuration: Disable and remove unnecessary modules and features to reduce the attack vector.
--Disable server_tokens: Rendre muet aux users à propos de la version utilisée. A ajouter dans nginx.conf :
server_tokens off;
--Firewall: Implement a firewall to restrict unnecessary traffic and avoid traffic to go to 80 port instead of 443 one. A NGFW is a common choice. And never forget to remove all “Any-to-Any” rules (audit loves to catch these types of active rules).
The ModSecurity module can be really usefull to complement WAF functions and more.
--Cryptography: Force the use of HTTPS with strong and valid SSL/TLS certificates to encrypt communication. The certificate must be, at least, 2048 bit of lenght and sha-256 standard. As always, do not forget to disable weak protocols, as SSLv3, TLS1.0 and TLS1.1, and adding TLS1.3 support as we can see in the example configuration of nginx.conf below:
ssl on;
ssl_protocols TLSv1.2 TLSv1.3;
ssl_prefer_server_ciphers on;
Sometimes a server block into /etc/nginx/sites-available/ path can have a dedicated configuration file, so use the same configuration shown above to it.
There is no point in disabling vulnerable protocols and leaving weak ciphers enabled, so we must proceed with the following configuration related to the ssl.conf configuration file in all server blocks:
ssl_ciphers “EECDH+ECDSA+AESGCM EECDH+aRSA+AESGCM EECDH+ECDSA+SHA384 EECDH+ECDSA+SHA256 EECDH+aRSA+SHA384 EECDH+aRSA+SHA256 EECDH+aRSA+RC4 EECDH EDH+aRSA HIGH !RC4 !aNULL !eNULL !LOW !3DES !MD5 !EXP !PSK !SRP !DSS”;
--Autoindex: The autoindex module is used to generate automatic directory listings, so do not forget to ignore it before compiling NGINX during the configuration phase by using the following command tag:
./configure — without-http_autoindex_module
Use OpenSSL to generate an acceptable Diffie-Hellman certificate:
openssl dhparam -out dhparams.pem 4096
It can take a few minutes, then add it to your ssl.conf file:
ssl_dhparam /opt/cert/dhparams.pem;
--Brute Force Protection: Configure tools like Fail2Ban or Auth0 to help to protect against brute force attacks.
--Log Monitoring: Regularly monitor NGINX logs for suspicious activity by forwarding logs to a good and well configured SIEM and pay attention to the alerts.
--Security Headers: Security headers are an essential part of server configuration to strengthen security against various threats. So let’s get them secured by adding some tags to be added to your server section:
The Strict-Transport-Security (HSTS) header instructs browsers to always use HTTPS for communication with the server, preventing SSL man-in-the-middle attacks:
add_header Strict-Transport-Security “max-age=31536000; includeSubDomains” always;
A well configured Content-Security-Policy (CSP) header restricts which resources can be loaded on your website, reducing the risk of XSS (Cross-Site Scripting) attacks, as the following example:
add_header Content-Security-Policy “default-src ‘self’; script-src ‘self’ ‘unsafe-inline’ ‘unsafe-eval’; style-src ‘self’ ‘unsafe-inline’; img-src ‘self’ data:; object-src ‘none’”;
This short X-Content-Type-Options header helps prevent the browser from interpreting files with MIME-types other than those declared in the Content-Type:
add_header X-Content-Type-Options “nosniff”;
The simple X-Frame-Options tag prevents Clickjacking attacks by controlling whether your site can be embedded in a <frame> or <iframe>:
add_header X-Frame-Options “SAMEORIGIN”;
The X-XSS-Protection header activates the Cross-Site Scripting filter built into slightly older browsers to protect against some attacks, old but gold:
add_header X-XSS-Protection “1; mode=block”;
Through the Referrer-Policy header we can control how referral data is sent between web pages and also APIs. This can help a little to protect user privacy:
add_header Referrer-Policy “no-referrer-when-downgrade”;
The Permissions-Policy header controls which client resources the application can or cannot use, such as location, webcam, etc:
add_header Permissions-Policy “geolocation=(),midi=(),sync-xhr=(),microphone=(),camera=(),magnetometer=(),gyroscope=(),fullscreen=(self),payment=()”;
— Unwanted methods: Same methods like TRACE, or DELETE can lead attackers to steal cookies information, or corrupt data, so we can limit requests like GET, HEAD & POST:
add_header Allow “GET, POST, HEAD” always;
if ( $request_method !~ ^(GET|POST|HEAD)$ ) {
return 405;
}
— Block user-agents robots: Preventing execution of scripts, robots and other automated methods of application data retrieval against your server, explicitly deny certain user-agents by inserting the following code to nginx.conf file:
if ($http_user_agent ~* LWP::Simple|BBBike|wget) {
return 403;
}
— Hide errors: Implement a generic error page to hide any specific errors, like 402, 403, 404, 405, etc.
— Proper User Configuration: Run NGINX as a non-privileged user to limit damage in case of a breach (least privilege principle, remember?).
— Resource control: Set buffer size restrictions for all the clients against Denial-of-Service attacks in order to protect your computing resources (and even some budget in case of cloud apps). So a new nginx.conf file codes are needed as the example below:
##buffer policy
client_body_buffer_size 1K;
client_header_buffer_size 1k;
client_max_body_size 1k;
large_client_header_buffers 2 1k;
##end buffer policy
— Vulnerability Scanning: Perform periodic scans for vulnerabilities, stablish a SLA to correct any weak spots found and be alert to any 0-day published regarding your resources.
Ensuring the delivery of secure and reliable products to end users, and reducing wasted time and resources on fixes that could have been avoided. Remember, security is an ongoing journey.
If you like my work feel free to support me!
Patreon: patreon.com/wasantosfi
—
How to Create an SSL Certificate for Nginx on Ubuntu 22
When running a web server, it’s crucial to secure it with SSL (Secure Sockets Layer) to ensure your website’s data is encrypted and secure. This article will guide you through the process of creating an SSL certificate for Nginx on Ubuntu 22.
SSL (Secure Sockets Layer) is a security protocol used to establish encrypted links between a web server and a browser. It ensures that all data passing between the web server and browsers remain private and integral, preventing hackers from stealing private information such as credit card numbers, names, and addresses. SSL is an essential component of web security and is used by millions of websites to protect their online transactions with their customers.
1: Install Certbot
Certbot is designed to simplify the process of setting up and renewing SSL certificates on your server. It uses Let’s Encrypt certificates, which are free, automated, and open certificates provided by the Internet Security Research Group (ISRG).
To install Certbot, run the following commands in your terminal:
sudo apt-get update
sudo snap install core; sudo snap refresh core
sudo snap install --classic certbotAs a final step, it’s recommended to link the Certbot command from the snap install directory to your system path. This will allow you to run Certbot by simply typing ‘certbot’ in your terminal. This step isn’t always necessary with all packages, but it’s useful when using snaps as they are designed to be less intrusive and avoid conflicts with other system packages.
sudo ln -s /snap/bin/certbot /usr/bin/certbot
These commands will update your package lists, ensure you have the necessary software to manage repositories, add the necessary repositories, and finally install Certbot and its Nginx plugin.
2: Obtain a Certificate
From Let’s Encrypt. You can do this using the following command:
sudo certbot --nginx -d example.com
This command will start the certification process. You’ll be prompted to enter your email address, which is used for urgent notices and certificate expiry warnings. You’ll also need to agree to the terms of service.
After providing the necessary information, Certbot will communicate with the Let’s Encrypt CA (Certificate Authority). It will then run a challenge to verify that you control the domain you’re requesting a certificate for. This ensures that only the legitimate owner of a domain can get a Let’s Encrypt certificate for it.
To create multiple certificates use the following command:
sudo certbot --nginx -d example.com -d example2.com
It’s important to be aware that the Certbot command highlighted above is designed to automatically alter your Nginx configuration file. This tool is very useful as it automates the process, reducing the risk of human error and simplifying the task. However, if your specific situation requires you to generate only the certificate, without any modifications to the Nginx configuration file, then the Certbot command might not be the best choice for you. In such a case, use the following command:
sudo certbot certonly --nginx -d example.com
3: Configure the UFW Firewall
To enable the UFW firewall, you can use the following command:
sudo ufw enable
Next, allow Nginx Full, which will enable both HTTP and HTTPS traffic:
sudo ufw allow 'Nginx Full'
To delete the redundant Nginx HTTP profile allowance:
sudo ufw delete allow 'Nginx HTTP'
You can then verify the changes by checking the status of the UFW firewall:
sudo ufw status
The output should show
Nginx Fullin the list of allowed services, meaning your firewall is now set up to allow web traffic.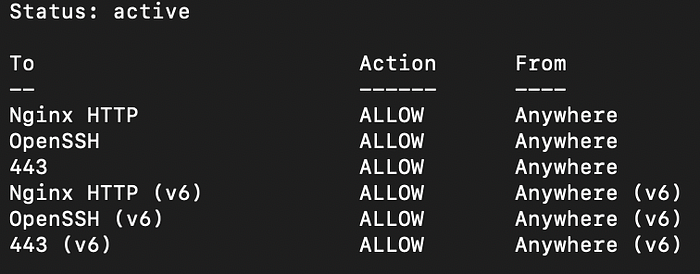
4: Configure Nginx
Once you’ve obtained your SSL certificate, Certbot will automatically configure Nginx to use it. It modifies the Nginx configuration file to point to the new certificate and sets up automatic renewal. This means you don’t have to worry about manually configuring your web server or renewing your certificate as Certbot takes care of it.
If “certonly” is used then certbot will not automatically configure Nginx. Add the following line in nginx.conf file
server {
   ...
   server_name example.com;
   ...
   #enalbe 443 ssl port
   listen [::]:443 ssl http2 ipv6only=on; # managed by Certbot
   listen 443 ssl http2; # managed by Certbot
   ssl_certificate /etc/letsencrypt/live/example.com/fullchain.pem; # managed by Certbot
   ssl_certificate_key /etc/letsencrypt/live/example.com/privkey.pem; # managed by Certbot
   include /etc/letsencrypt/options-ssl-nginx.conf; # managed by Certbot
   ssl_dhparam /etc/letsencrypt/ssl-dhparams.pem; # managed by Certbot
}
Use the command
sudo nginx -tto test your Nginx configuration. If the syntax is okay, the system will return a message saying "syntax is okay. configuration file /etc/nginx/nginx.conf test is successful." If you see this message, it means that your configuration file has no syntax errors.To ensure the changes take effect, restart Nginx using the command
sudo systemctl restart nginx. This will apply the configuration changes.5: Verify Certbot Auto-Renewal
Let’s Encrypt’s certificates are valid for 90 days. However, Certbot automatically renews the certificates before they expire to prevent any downtime due to an expired certificate.
sudo systemctl status snap.certbot.renew.service
To verify that automatic renewal is set up correctly, you can run a dry run with the following command:
sudo certbot renew --dry-run
If the dry run completes successfully, it means automatic renewal is set up correctly. Your website is now secured with an SSL certificate, and you can rest easy knowing that Certbot will automatically renew your certificate before it expires.
—
Self-signed SSL Certificate with SAN for Apache on Ubuntu
self-signed SSL certificate with a Subject Alternative Name (SAN) for an Apache web server on Ubuntu.
Au début, aller dans le dossier frontend
1. Dossier pour les certificats
mkdir certificates
cd certificates
2. Générer une clé privée
openssl genpkey -algorithm RSA -out private.key
genpkey: sub-command for generating private keys.-algorithm RSA: algorithm utilisé for key generation. Ici, RSA.-out private.key: output file for the generated private key. Ici, the private key will be saved in a file namedprivate.key.[Not Recommended] If you want your private.key remains password protected, then :
openssl genpkey -algorithm RSA -aes256 -out private.key
-aes256: encryption algorithm used for the private key. Ici, AES with a key length of 256 bits. This parameter ensures that the private key is encrypted using AES-256 for added security. The user will be prompted to enter a passphrase during the key generation process, and this passphrase is used to encrypt the private key.You’ll be prompted to enter a passphrase; remember this passphrase as you’ll need it later.
3. Fichier de config pour SAN
Créer un fichier
san.confcontenant :[req] distinguished_name = req_distinguished_name req_extensions = req_ext prompt = no [req_distinguished_name] CN = localhost C = FR ST = Bretagne L = Brest O = Robist OU = Developers emailAddress = smazoomder@gmail.com [req_ext] subjectAltName = IP:192.168.0.100
[req]: Section specifies the attributes for the certificate request.-
distinguished_name = req_distinguished_name: Refers to the distinguished name section-
req_extensions = req_ext: Points to the extensions section, which allows you to include additional information in the certificate.-
prompt = no: Disables prompting for certificate details during the certificate creation process.[req_distinguished_name]: Defines various distinguished name attributes.-
CN = localhost: Common Name (CN), typically the domain name associated with the certificate.-
C = FR: Pays.-
ST = Bretagne: State or region (Dhaka in this case).-
L = Brest: Locality or city.-
O = Robist: Organization name.-
OU = Developers: Organizational Unit or department (Developers in this case).-
emailAddress = smazoomder@gmail.com: Email address associated with the certificate.[req_ext]: Extensions section, allowing for the inclusion of additional extensions in the certificate.-
subjectAltName = IP:192.168.0.100: Subject Alternative Name (SAN), incluant an IP address as an alternative identifier for the entity associated with the certificate.Breakdown of Subject Alternative Name (SAN) :
- Subject: In the context of SSL/TLS certificates, the “subject” refers to the entity (a website or server) for which the certificate is issued. It often includes information like the Common Name (CN), organization, and location.
- Alternative Name: additional identifiers that can be included in the SSL/TLS certificate. These identifiers go beyond the Common Name (CN) and provide flexibility in specifying other valid names for the certificate.
Why SAN is Needed:
- Support for Multiple Identifiers: SAN allows a single SSL/TLS certificate to be valid for multiple identifiers. Traditionally, SSL certificates were issued based on the Common Name (CN) field, which represented the main domain. However, with the growing need for flexibility, SAN enables the inclusion of additional names.
- Multi-Domain Certificates: SAN is particularly useful in scenarios where a single certificate needs to cover multiple domains or subdomains. Instead of obtaining separate certificates for each domain, a multi-domain certificate with SAN extension can include all the necessary identifiers.
- IP Addresses and Email Addresses: SAN is not limited to domain names; it can also include IP addresses and email addresses as alternative identifiers. This is valuable in situations where certificates need to cover services accessed via IP addresses or email communication.
- Wildcard Certificates: SAN is commonly used in conjunction with wildcard certificates. A wildcard certificate covers a domain and its subdomains, and SAN can further extend its coverage to additional domains.
- Avoidance of Certificate Mismatch Issues: Including SAN helps prevent issues related to certificate mismatches. When a user accesses a service through an alternative name, the presence of SAN ensures that the certificate is still considered valid.
In summary, Subject Alternative Name (SAN) is an extension to SSL/TLS certificates that allows for the inclusion of multiple identifiers, providing flexibility and broader coverage for various naming scenarios in secure communications.
4: Generate a Certificate Signing Request (CSR)
openssl req -new -key private.key -out certificate.csr -config san.conf
openssl req: This is the OpenSSL command used for creating and processing certificate requests.-new: Indicates that a new CSR (Certificate Signing Request) is being generated.-key private.key: private key file used for generating the CSR. The private key generated in the previous step (private.key) is used here.-out certificate.csr: output file where the generated CSR will be saved. Ici,certificate.csr.-config san.conf: configuration file (san.conf) contains additional settings, including Subject Alternative Names (SANs) for the certificate.5: Generate a Self-Signed Certificate
openssl x509 -req -in certificate.csr -signkey private.key -out server.cert -days 365
openssl x509: OpenSSL command used for signing and displaying X.509 certificate files.-req: Indicates that the input file (certificate.csr) is a Certificate Signing Request (CSR).-in certificate.csr: Specifies the input file containing the Certificate Signing Request (CSR) that needs to be signed. In this example, the CSR file iscertificate.csr.-signkey private.key: Specifies the private key (private.key) to be used for signing the CSR and generating the certificate.-out server.cert: Specifies the output file where the signed X.509 certificate will be saved. In this example, the certificate file is namedserver.cert.-days 365: Specifies the validity period of the certificate in days. In this case, the certificate will be valid for 365 days (1 year).Breakdown of X.509 Ceritificate
An X.509 certificate is a digital certificate that follows the X.509 standard, which defines the format and structure for public-key certificates. These certificates are widely used in internet security protocols, including TLS/SSL for secure web communication. Here’s a breakdown of the X.509 certificate:
Key Components of an X.509 Certificate:
- Version: Indicates the version of the X.509 standard used in the certificate (e.g., version 1, 2, or 3).
- Serial Number: A unique identifier assigned by the certificate issuer (Certificate Authority) to differentiate certificates.
- Signature Algorithm: Specifies the cryptographic algorithm used by the Certificate Authority to sign the certificate.
- Issuer: Identifies the entity (usually a Certificate Authority) that issued the certificate.
- Validity Period: Defines the time period during which the certificate is considered valid. It includes a “Not Before” and “Not After” date.
- Subject: Identifies the entity (e.g., a person, organization, or device) associated with the public key in the certificate.
- Subject Public Key Info: Contains the public key and the algorithm used by the subject.
- Extensions: Additional information or attributes associated with the certificate. This may include Subject Alternative Names (SAN), key usage, and more.
- Certificate Signature Algorithm: Specifies the algorithm used by the Certificate Authority to sign the certificate.
- Certificate Signature Value: Contains the digital signature created by the Certificate Authority, ensuring the integrity and authenticity of the certificate.
Purpose of X.509 Certificates:
- Authentication: Verifies the identity of the certificate holder (subject).
- Encryption: Facilitates secure communication by providing a means to encrypt data using the public key.
- Digital Signatures: Allows for the creation and verification of digital signatures, ensuring data integrity.
- Key Exchange: Supports the exchange of cryptographic keys in secure communication protocols.
Usage in SSL/TLS:
- In the context of SSL/TLS protocols, X.509 certificates are essential for establishing secure connections between clients and servers. When a client connects to a secure website, the server presents its X.509 certificate, which the client verifies to ensure a secure and trusted connection.
- X.509 certificates may be self-signed for internal use or signed by a trusted Certificate Authority for public-facing websites.
Understanding X.509 certificates is crucial for anyone involved in web security, system administration, or software development.
6: Update Apache Configuration
Update your Apache VirtualHost configuration (
/etc/apache2/sites-available/your-site.conf):<VirtualHost *:443> ServerName localhost ServerAdmin webmaster@localhost DocumentRoot /var/www/html/your-project/backend/public SSLEngine on SSLUseStapling off SSLCertificateFile /var/www/html/your-project/certificates/server.cert SSLCertificateKeyFile /var/www/html/your-project/certificates/private.key ServerAlias 192.168.0.88 <Directory "/var/www/html/your-project/backend/public"> Options All AllowOverride All Require all granted </Directory> </VirtualHost>
Breakdown of the Configuration:
<VirtualHost *:443>: Defines a VirtualHost block for HTTPS communication on port 443.ServerName localhost: Specifies the primary domain name associated with this VirtualHost. In this case, it is set to “localhost.”ServerAdmin webmaster@localhost: Email address of the server administrator.DocumentRoot /var/www/html/your-project/backend/public: Sets the document root directory for this VirtualHost. This is the location where the web server looks for files to serve.SSLEngine on: Enables the SSL engine for this VirtualHost, indicating that it should handle SSL connections.SSLUseStapling off: Disables SSL stapling. SSL stapling is a mechanism to enhance SSL/TLS certificate verification, but it’s turned off in this example.SSLCertificateFile /var/www/html/your-project/certificates/server.cert: Specifies the path to the SSL certificate file. This is the public key certificate file generated in previous steps.SSLCertificateKeyFile /var/www/html/your-project/certificates/private.key: Specifies the path to the private key file associated with the SSL certificate.ServerAlias 192.168.0.88: Additional domain names or IP addresses that this VirtualHost should respond to. In this case, it includes the IP address 192.168.0.88.<Directory "/var/www/html/your-project/backend/public">: Begins the configuration block for the specified directory.Options All: Allows all available options for this directory.AllowOverride All: Allows the use of the .htaccess file for configuration overrides in this directory.Require all granted: Grants access to all users.</Directory>: Ends the configuration block for the specified directory.</VirtualHost>: Ends the VirtualHost block.Purpose of the Configuration:
- This configuration block ensures that Apache knows how to handle SSL connections for the specified domain (localhost and 192.168.0.88). It points to the SSL certificate files and defines access settings for the associated directory.
- Make sure to replace placeholders like “/var/www/html/your-project” with the actual paths used in your project.
Then enable it :
sudo a2ensite your-site.conf
7: Restart Apache
sudo systemctl restart apache2
You’ll be prompted to enter the passphrase for the SSL/TLS keys.
8: Check Apache Error Logs
sudo tail -f /var/log/apache2/error.log
Look for any error messages related to SSL.
9: Set Permissions for Laravel Storage
cd /var/www/html/your-project/backend
sudo chmod -R 775 storage
sudo chown -R www-data:www-data storageNow, you should be able to access your application securely at
https://192.168.0.88(Your IP)10: if you running react/laravel application
in frontend env :
REACT_APP_NAME = 'your-project'
REACT_APP_VERSION = v1.1.0
GENERATE_SOURCEMAP = false
REACT_APP_API_BASE_URL='https://192.168.0.88/api'
REACT_APP_ASSET_BASE_URL='https://192.168.0.88/storage'
REACT_APP_MAIN_DOMAIN='192.168.0.88:3000'
REACT_APP_API_DOMAIN='https://192.168.0.88'
REACT_APP_BACK_DOMAIN = 'https://192.168.0.88'
REACT_APP_SITE_KEY = 'your-key'
in backend env :
APP_URL=https://192.168.0.88
APP_SITE_URL="https://192.168.0.88:3000"
Congratulations! You have successfully created a self-signed SSL certificate with a Subject Alternative Name for your Apache web server on Ubuntu.
If you have a problem, then run
sudo systemctl restart apache2
cd /var/www/html/your-project/backend
sudo chmod -R 775 storage
sudo chown -R www-data:www-data storage
(Optional) Update /etc/hosts
Ensure that your
/etc/hostsfile includes an entry forlocalhostand the IP address192.168.0.88(your IP)(Optional) Import Certificate into Chrome:
- Creating Authority & Convert the certificate to CRT format:
openssl x509 -in server.cert -out server.crt
- Convert Certificate and Key to PKCS#12 Format:
openssl pkcs12 -export -out certificate.pfx -inkey private.key -in server.cert
You’ll be prompted to enter the passphrase for the private key.
3. Import Certificate into Chrome:
- Open Chrome and go to
Settings.- Scroll down and click on
Advanced.- Under
Privacy and security, click onManage certificates.- In the
Certificateswindow, go to thePersonaltab.- Click on
Importand select thecertificate.pfxfile you generated.- Follow the import wizard, enter the passphrase when prompted, and choose the certificate store.
4. If you want to make sure to add the Certificate Authority(CA) in trusted list :
sudo cp server.crt /usr/local/share/ca-certificates/server.crt
sudo update-ca-certificatesUse the following command to make sure that your certificates have been added to the trust list:
awk -v cmd=’openssl x509 -noout -subject’ ‘ /BEGIN/{close(cmd)};{print | cmd}’ < /etc/ssl/certs/ca-certificates.crt | grep -i localhost
To check the full details of the certificate, you can use OpenSSL or another tool. For example, using OpenSSL:
openssl x509 -in server.cert -text -noout
Check Expiry Date: Ensure that the SSL certificate has not expired. You can use the following OpenSSL command to check the expiry date:
openssl x509 -enddate -noout -in server.cert
Verify Certificate Content:
You can use OpenSSL to view the content of your certificate and private key files. Check if they contain the expected information:
openssl x509 -in server.cert -text -noout
openssl rsa -in private.key -text -nooutIf you need that, the private key file is not password-protected. If it is, you may need to remove the passphrase from the private key.
openssl rsa -in private.key -out private.key
If you want to verify the certificate
openssl verify server.crt
—
Change the Index HTML in Nginx: A Beginner’s Expedition
/etc/nginx/nginx.conf
The index HTML file is the default file that Nginx serves when a user accesses a website. It’s usually located in the root directory of the website. To find the location of the index HTML file, check the Nginx configuration file for the root directive. This directive specifies the root directory of the website. Once you’ve located the root directory, the index HTML file is typically named index.html or index.htm. It’s important to note that the location of the index HTML file may vary depending on the specific Nginx configuration.
server {
   listen 80;
   server_name example.com;
   root /var/www/html;
   location / {
      try_files $uri $uri/ =404;
   }
}
if the root directive is not immediately visible within the main nginx.conf file, it’s often because it resides in a separate configuration file. These files are typically found in the conf.d or sites-enabled directories. Such a structure allows for cleaner and more organized management of different websites or domains hosted on a single server. By separating them, Nginx can apply specific settings to each site, including the location of its index HTML file.
user www-data;
worker_processes auto;
pid /run/nginx.pid;
include /etc/nginx/modules-enabled/*.conf;events {
   worker_connections 768;
   # multi_accept on;
}
http {
   # Basic Settings
   sendfile on;
   tcp_nopush on;
   tcp_nodelay on;
   keepalive_timeout 65;
   types_hash_max_size 2048;
   include /etc/nginx/mime.types;
   default_type application/octet-stream;    # SSL Settings
   ssl_protocols TLSv1 TLSv1.1 TLSv1.2; # Dropping SSLv3, ref: POODLE
   ssl_prefer_server_ciphers on;    # Logging Settings
   access_log /var/log/nginx/access.log;
   error_log /var/log/nginx/error.log;    # Gzip Settings
   gzip on;
   gzip_disable "msie6";    # Virtual Host Configs
   include /etc/nginx/conf.d/*.conf;
   include /etc/nginx/sites-enabled/*;
}
Editing the Nginx Configuration File
To edit the Nginx configuration file, follow these steps:
- Open the terminal or command prompt.
- Navigate to the directory where the Nginx configuration file is located.
- Use a text editor to open the configuration file (e.g., sudo nano nginx.conf).
- Make the necessary changes to the file, such as modifying the server block or adding new location blocks.
- Save the changes and exit the text editor.
- Test the configuration file for syntax errors by running sudo nginx -t.
- If there are no errors, reload the Nginx service to apply the changes (e.g., sudo systemctl reload nginx).
Remember to back up the configuration file before making any changes, and double-check the syntax to avoid any errors. If you encounter any issues, refer to the Nginx documentation or seek assistance from the Nginx community.
Modifying the Index HTML File
To modify the index HTML file in Nginx, follow these steps:
- Locate the index HTML file in your Nginx configuration directory.
- Open the index HTML file in a text editor.
- Make the necessary changes to the HTML code.
- Save the file and exit the text editor
Common Questions:
- Where can I find the configuration file for Nginx?
- Look for the Nginx configuration file at /etc/nginx/nginx.conf.
- Is it possible to relocate the index HTML file within Nginx?
- Indeed, by altering the Nginx configuration file, you can shift the index HTML file’s location.
- What steps should I follow to modify the Nginx configuration file?
- Utilize a text editor like nano or vim to make edits to the Nginx configuration file.
- Where does Nginx usually store the index HTML file by default?
- Nginx generally keeps the index HTML file in the /usr/share/nginx/html directory.
- Am I able to edit the index HTML file directly?
- Absolutely, you have the ability to update the index HTML file with a text editor.
- Should I restart Nginx to apply new configurations?
- Restarting Nginx is required to activate any new configuration changes.
The Practicality of Mastery in Nginx Configuration
Understanding the nginx.conf file isn’t just academic — it’s a vital skill for real-world applications. Whether you’re deploying a simple blog or a complex microservices architecture with Kubernetes, the need to tweak nginx.conf surfaces frequently. For instance, when securing communications with SSL/TLS, you’ll dive into this file to point Nginx to your certificates. Or perhaps you’re optimizing performance; here too, nginx.conf holds the keys to tweaking file caching and client connection limits.
It’s in scenarios like setting up a reverse proxy or handling multiple domains where mastering nginx.conf moves from being useful to being essential. By mastering the location and editing of the index HTML file, you empower yourself to respond dynamically to the needs of your site and your audience. So, take the helm, customize confidently, and remember that each change is a step towards a more tailored and efficient web experience.
—
Use Nginx as a Reverse Proxy
In the domain of web services, efficient handling of incoming traffic, load balancing, and securing server resources are paramount. Nginx, a powerful web server, also excels as a reverse proxy, offering a wealth of benefits when appropriately configured. Understanding how to utilize Nginx as a reverse proxy can significantly optimize service performance and improve overall system management.
What is a Reverse Proxy?
A reverse proxy serves as an intermediary between clients and backend servers. While a typical proxy forwards client requests to the internet, a reverse proxy forwards requests from the internet to backend servers. It enhances security, improves performance through caching, and load balancing, and assists in server resource optimization.
Nginx’s reverse proxy capabilities are versatile, offering features like load balancing, caching, SSL termination, and content compression. To illustrate its functionality, let’s consider an example:
you have a user service running on port 5000, which you want to be accessed through Nginx instead of allowing direct access to the user service. Nginx will act as a reverse proxy, receiving incoming requests from users and forwarding them to the user service running on port 5000.
Here’s a breakdown of how this setup works:
- User Service (Running on Port 5000): This service is the main functionality that users want to access. It might contain user-related functions, such as user authentication, user data management, etc.
- Nginx Server: Nginx is a powerful web server that can also act as a reverse proxy. In this case, it will sit in front of your user service and manage incoming requests.
The steps to set up Nginx to redirect requests to your user service could involve:
If you already have Nginx installed and operational on your system, you can proceed directly to the next step!
Nginx using Docker
Running Nginx in Docker is a straightforward process. Docker allows you to containerize Nginx, making it easy to manage and deploy. Below are the steps to run Nginx in Docker:
1: Install Docker
2: Pull the Nginx Docker Image
docker pull nginx
3: Run Nginx Container
Now that you have the Nginx image, you can create and run a Docker container using the following command:
docker run -d -p 8080:8080 --name my_nginx nginx
-
docker run: Command to create and start a new container.-
-d: Detached mode, which runs the container in the background.
--p 8080:8080: Maps port 8080 of the host to port 8080 of the container, allowing you to access Nginx on the host machine athttp://localhost.-
--name my_nginx: Assigns the namemy_nginxto the running container.-
nginx: The name of the Docker image you want to use for the container.Nginx is now running in the Docker container. You can access the Nginx web server by opening your web browser and navigating to
http://localhost. If you see the default Nginx welcome page, it means Nginx is running successfully in the Docker container.you can also stop the container by using the following command
docker stop my_nginx
Set Up Reverse Proxy
if the user service is running on
http://localhost:5000, Nginx can be configured to forward incoming requests to this address.Here’s a simple example of an Nginx configuration block that sets up a reverse proxy:
server {
   listen 8080;
   server_name localhost;
   location / {
      proxy_pass http://localhost:5000;
      proxy_set_header Host $host;
      proxy_set_header X-Real-IP $remote_addr;
      proxy_set_header X-Forwarded-For $proxy_add_x_forwarded_for;
      proxy_set_header X-Forwarded-Proto $scheme;
   }
}
Explanation of the Configuration
-
serverblock defines the settings for the server.-
listen 8080;tells Nginx to listen on port 8080 for incoming connections.-
server_name localhost;the directive in the Nginx configuration block ensures that its settings are only applied to requests where theHostheader matches "localhost".-
location / { … }specifies that any request received on this server block’s root URL will be proxied to the defined location.
-proxy_passhttp://localhost:5000;directs Nginx to pass the requests to the backend service running onhttp://localhost:5000.- The
proxy_set_headerlines pass additional headers to the backend server, including the host, real IP, forwarded-for address, and protocol used.Attaching the Configuration File to the Nginx Container
Run the Nginx container again, this time mounting the local Nginx configuration file from the host machine to the Nginx container:
docker run -d -p 8080:8080 --name my_nginx -v /path/to/local/nginx.conf:/etc/nginx/nginx.conf:ro nginx
Replace
/path/to/local/nginx.confwith the path to the local Nginx configuration file you created earlier.User Flow
When a user sends a request to your service, they will access Nginx, typically through a domain or IP address (example.com in the configuration block). Nginx will then:
- Receive the incoming request.
- Redirect (or proxy) this request to the user service running on port 5000.
- The user service processes the request and sends the response back to Nginx.
- Nginx, in turn, forwards the response back to the user who made the initial request.
Benefits
- Security: It hides the internal structure of your system, enhancing security by not exposing the user service directly to external users.
- Load Balancing: Nginx can distribute incoming requests among multiple instances of the user service, balancing the load to ensure optimal performance.
- Caching and Acceleration: Nginx can cache content, improving the speed and efficiency of serving frequently accessed data.
—
Install TLS/SSL on Docker Nginx Container With Let’s Encrypt
Are you running an Nginx Docker container and want to ensure secure and encrypted connections for your website? Look no further! In this comprehensive tutorial, I will guide you through the process of obtaining a free SSL certificate from Let’s Encrypt using Certbot. By following these step-by-step instructions, you will fortify your Nginx container with robust SSL encryption, bolstering the security of your web application.
In this tutorial, you will discover how to secure your Nginx Docker container by leveraging Let’s Encrypt and Certbot. We will use Certbot to obtain a free SSL certificate for Nginx.
You will need the following to follow this tutorial:
- A Ubuntu server
- A registered domain name. You can take a look at Namecheap to purchase a domain name. We will use www.example.com for the purpose of this tutorial.
- Set up two DNS records for your server: an A record, for example.com, that points to your server’s public IP address, and an A record for www.example.com, also pointing to the same IP address.
- Docker installed on your server(version 20.10.22) or a later version.
- Docker-compose installed on your server (version 1.29.0) or a later version.
What is Let’s Encrypt?
Let’s Encrypt is a global Certificate Authority (CA). We let people and organizations worldwide obtain, renew, and manage SSL/TLS certificates. According to Let’s Encrypt, websites can use their certificates to enable secure HTTPS connections. LetsEncrypt
Now that you know a little about Let’s Encrypt, let’s look at the steps involved:
1: Install Certbot
To use Let’s Encrypt to obtain an SSL certificate, the first step is to install Certbot on your server.
Install Certbot with
aptand follow the prompts by selecting ok or entering Yes where required.sudo apt update
sudo apt install certbotThe Certbot software is now ready to use. The next step is to obtain the SSL certificate.
2: Obtain TSL/SSL Certificate
The next step is to obtain the TLS/SSL certificate from the Let’s Encrypt authority using the Certbot software. You must type the following to get the TSL/SSL certificate.
sudo certbot certonly --webroot --webroot-path /your/project/root/public/directory/path -d example.com
Let’s quickly explain what the Certbot options do:
- certonly: This option tells Certbot only to obtain the certificate, and you will do the manual installation.
- — webroot: The webroot plugin requires that you specify a directory on your server where Certbot can place a temporary file to prove that you have control over the domain you request a certificate for.
- — webroot-path: This specifies the directory where Certbot should place the temporary file.
- -d: This option specifies the domain or subdomain you want to obtain a certificate.
If this is your first time running
certbot, you will be prompted to enter your email address and agree to the service terms.Saving debug log to /var/log/letsencrypt/letsencrypt.log
Enter email address (used for urgent renewal and security notices)
(Enter ‘c’ to cancel): test@mail.com- - - - - - - - - - - - - - - - - - - - - - - - - - - - - - - - - - - - - - - -
Please read the Terms of Service at
https://letsencrypt.org/documents/LE-SA-v1.3-September-21-2022.pdf. You must
agree in order to register with the ACME server. Do you agree?
- - - - - - - - - - - - - - - - - - - - - - - - - - - - - - - - - - - - - - - -
(Y)es/(N)o: YIf this command you just run is successful,
certbotwill ask how you would like to redirect traffic to HTTPS.Please choose whether or not to redirect HTTP traffic to HTTPS, removing HTTP access.
- - - - - - - - - - - - - - - - - - - - - - - - - - - - - - - - - - - - - - - -
1: No redirect - Make no further changes to the webserver configuration.
2: Redirect - Make all requests redirect to secure HTTPS access. Choose this for
new sites, or if you’re confident your site works on HTTPS. You can undo this
change by editing your web server’s configuration.
- - - - - - - - - - - - - - - - - - - - - - - - - - - - - - - - - - - - - - - -
Select the appropriate number [1-2] then [enter] (press ‘c’ to cancel):Hit the
EnterKey when you are done making your choice. If successful, you should get a message that looks like this:IMPORTANT NOTES:
- Congratulations! Your certificate and chain have been saved at:
/etc/letsencrypt/live/example.com/fullchain.pem
Your key file has been saved at:
/etc/letsencrypt/live/example.com/privkey.pem
Your cert will expire on 2023-07-18. To obtain a new or tweaked
version of this certificate in the future, simply run certbot again
with the "certonly" option. To non-interactively renew *all* of
your certificates, run "certbot renew"
- If you like Certbot, please consider supporting our work by:Donating to ISRG / Let’s Encrypt: https://letsencrypt.org/donate
Donating to EFF: https://eff.org/donate-le3: Copy The TSL/SSL Certificates
Your certificates have been downloaded in this directory
/etc/letsencrypt/live/example.com/. You will need to copy out the certificates to a new directory/etc/letsencryptwith any symbolic links encountered in the source directory using the-Loption so that the contents of the linked files are copied rather than just the link itself.sudo mkdir -p /etc/letsencrypt/ssl #create an SSL directory to save the fullchain and privkey files
sudo cp -r -L /etc/letsencrypt/live/example.com/fullchain.pem /etc/letsencrypt/ssl/
sudo cp -r -L /etc/letsencrypt/live/example.com/privkey.pem /etc/letsencrypt/ssl/You might want to give the necessary permissions so that the certificates in the new directory are read only by a specific user and group as thus:
sudo chown <nginx_user>:<nginx_group> /etc/letsencrypt/ssl/fullchain.pem
sudo chown <nginx_user>:<nginx_group> /etc/letsencrypt/ssl/privkey.pem4: Update Docker-compose File
You should create another file and name it docker-compose-production.yml, assuming you already have a docker-compose.yml file you use locally. This is to differentiate the production docker-compose file, which would have the certificates referenced by paths.
So here is what your
docker-compose-production.ymlshould look like after updating it.nginx:
container_name: example_nginx_prod
image: nginx:latest
ports:
- "${SSL_PORT}:443″
- "${HTTP_PORT}:80″
volumes:
- ./:/your/project/root/directory/path
- /etc/letsencrypt/ssl/fullchain.pem:/etc/nginx/ssl/fullchain.pem
- /etc/letsencrypt/ssl/privkey.pem:/etc/nginx/ssl/privkey.pem5: Update Your Nginx conf
The next step is to update your nginx conf file in your docker container to include the certificates like thus:
server {
   listen [::]:443 ssl;
   listen 443 ssl;
   root /your/project/root/public/directory/path;
   index index.html index.php index.htm index.nginx-debian.html;
   error_log  /var/log/nginx/error.log;
   access_log /var/log/nginx/access.log;
   server_name example.com;
   ssl_certificate /etc/nginx/ssl/fullchain.pem;
   ssl_certificate_key /etc/nginx/ssl/privkey.pem;
   error_page 404 /index.php;
   location / {
      try_files $uri $uri/ /index.php?$query_string;
   }
}
Step 6: Rebuild The Docker Container
At this point, you are done with the hard part. You need to rebuild the docker container for your changes to take effect. For example, using docker-compose, you could do it this way:
docker-compose -f docker-compose-production.yml build
Note: You can use the `no-cache` option if need be.
docker-compose -f docker-compose-production.yml build --no-cache
Now, bring your docker container back up using this command.
docker-compose -f docker-compose-production.yml up -d
Conclusion:
Remember to renew your SSL certificates to maintain continuous security regularly.
Automate SSL Setup with Certbot, Nginx, and Docker
Securing your website with SSL/TLS encryption is essential for protecting sensitive data and ensuring trust with your users. In this tutorial, we’ll explore how to automate the process of setting up SSL certificates using Certbot, Nginx, and Docker. By automating SSL setup, you can streamline the process of securing your website and ensure that your certificates stay up-to-date with minimal manual intervention.
Prerequisites
- Basic understanding of Docker and Docker Compose.
- A domain name pointed to your server’s IP address.
- Docker installed on your server.1. Install Docker and Docker Compose:
If you haven’t already, install Docker and Docker Compose on your server. You can follow the official Docker installation guide for your operating system.
2. Set Up Nginx Docker Container:
Create a Dockerfile and Nginx configuration file for your Nginx container. Your Dockerfile might look like this:
FROM nginx:latest
# Copy Nginx configuration file
COPY nginx.conf /etc/nginx/nginx.confYour `nginx.conf` file should include the necessary server blocks and configuration for your website.
3. Install Certbot and Configure Certificates:
Install Certbot on your server. Certbot is an open-source tool for automatically generating and managing SSL certificates. You can install Certbot using the instructions provided in the Certbot documentation for your operating system.
4. Automate Certificate Renewal with Certbot and Docker Compose:
Create a Docker Compose file (`docker-compose.yml`) to manage your Nginx and Certbot containers. Your `docker-compose.yml` file might look like this:
version: '3'
services:
nginx:
build: .
ports:
- "80:80"
- "443:443"
volumes:
- ./nginx.conf:/etc/nginx/nginx.conf
- ./certbot_data:/var/www/certbot
depends_on:
- certbot
certbot:
image: certbot/certbot
volumes:
- ./certbot_data:/var/www/certbot
entrypoint: "/bin/sh -c 'trap exit TERM; while :; do certbot renew; sleep 12h & wait $${!}; done;'"
This Docker Compose configuration sets up two services: Nginx and Certbot. The Certbot service runs a command to renew certificates every 12 hours.
5. Obtain SSL Certificates:
Run the Docker Compose command to start the Nginx and Certbot containers:
docker-compose up -d
Certbot will automatically obtain SSL certificates for your domain and configure Nginx to use HTTPS.
6. Test SSL Configuration:
Verify that SSL is configured correctly by accessing your website using HTTPS. You can use online SSL testing tools to check for any configuration errors.
7. Automate Docker Compose and Certbot Renewal:
To ensure that your SSL certificates are always up-to-date, set up a cron job or systemd timer to automatically renew Docker Compose and Certbot. For example, you can create a shell script that runs `docker-compose up -d` periodically and add it to your system’s cron or systemd configuration.
—
PHP Web App with Docker Compose, Nginx, and MariaDB
Step 1 — Create a Nginx Container
Before we begin, we’ll set up an Nginx container to host our PHP application. Follow these steps:
- Create a directory for your project and navigate to it:
mkdir ~/docker-project
cd ~/docker-project2. Create a
docker-compose.ymlfile for launching the Nginx container:nano docker-compose.yml
3. Add the following configuration to the
docker-compose.ymlfile:version: "3.9″
services:
nginx:
image: nginx:latest
container_name: nginx-container
ports:
- 80:80This configuration ensures that the Nginx container runs on port 80. Save and close the file.
4. Launch the Nginx container:
docker-compose up -d
5. Verify that the Nginx container is running:
docker ps
You should see an output similar to this:
CONTAINER ID IMAGE COMMAND CREATED STATUS PORTS NAMES
c6641e4d5bbf nginx:latest "/docker-entrypoint.…" 5 seconds ago Up 3 seconds 0.0.0.0:80->80/tcp, :::80->80/tcp nginx-container6. Open your web browser and access your Nginx container using the URL
http://your-server-ip. You should see the Nginx test page.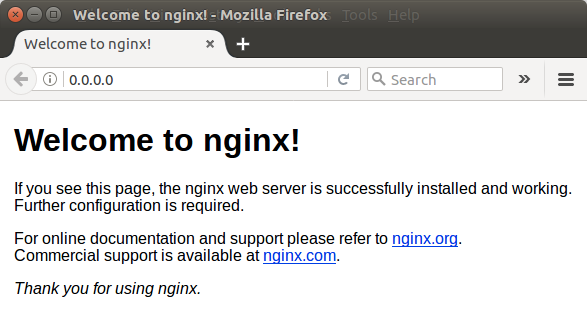
Step 2 — Create a PHP Container
In this step, we’ll set up a PHP container to host our PHP application. Follow these steps:
- Create a directory for your PHP code inside your project:
mkdir ~/docker-project/php_code
2. Clone your PHP code into the
php_codedirectory. Replace[GitHub URL]with the actual URL of your PHP code:git clone https://github.com/rapidcode-technologies-private-limited/php-e-commerce.git ~/docker-project/php_code/
3. Create a Dockerfile for the PHP container:
nano ~/docker-project/php_code/Dockerfile
4. Add the following lines to the Dockerfile:
FROM php:7.0-fpm
RUN docker-php-ext-install mysqli pdo pdo_mysql
RUN docker-php-ext-enable mysqliSave and close the file.
5. Create a directory for Nginx inside your project directory:
mkdir ~/docker-project/nginx
6. Create an Nginx default configuration file to run your PHP application:
nano ~/docker-project/nginx/default.conf
7. Add the following Nginx configuration to the
default.conffile:server {
listen 80 default_server;
root /var/www/html;
index index.html index.php;charset utf-8;
location / {
try_files $uri $uri/ /index.php?$query_string;
}location = /favicon.ico { access_log off; log_not_found off; }
location = /robots.txt { access_log off; log_not_found off; }access_log off;
error_log /var/log/nginx/error.log error;sendfile off;
client_max_body_size 100m;
location ~ .php$ {
fastcgi_split_path_info ^(.+.php)(/.+)$;
fastcgi_pass php:9000;
fastcgi_index index.php;
include fastcgi_params;
fastcgi_read_timeout 300;
fastcgi_param SCRIPT_FILENAME $document_root$fastcgi_script_name;
fastcgi_intercept_errors off;
fastcgi_buffer_size 16k;
fastcgi_buffers 4 16k;
}location ~ /.ht {
deny all;
}
}Save and close the file.
8. Create a Dockerfile inside the
nginxdirectory to copy the Nginx default config file:nano ~/docker-project/nginx/Dockerfile
9. Add the following lines to the Dockerfile:
FROM nginx
COPY ./default.conf /etc/nginx/conf.d/default.conf10. Update the
docker-compose.ymlfile with the following contents:version: "3.9″
services:
nginx:
build: ./nginx/
ports:
- 80:80volumes:
- ./php_code/:/var/www/html/php:
build: ./php_code/
expose:
- 9000
volumes:
- ./php_code/:/var/www/html/11. Launch the containers:
cd ~/docker-project
docker-compose up -d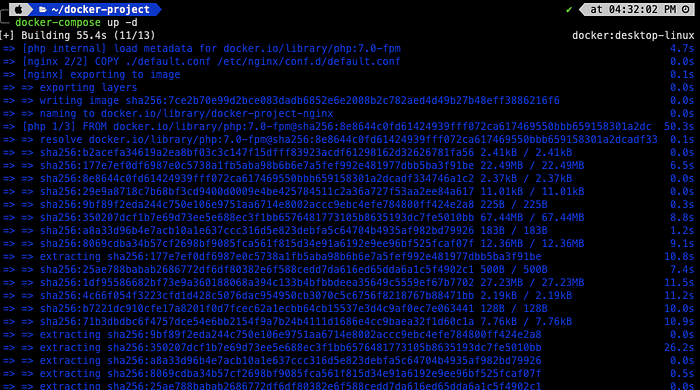
12. Verify that the containers are running:
docker ps

Open your web browser and access the URL
http://your-server-iporlocalhost. You should now see your PHP web content.Step 3 — Create a MariaDB Container
In this final step, we’ll set up a MariaDB database container and configure it to work with our PHP application.
Follow these steps:
- Edit the
docker-compose.ymlfile to add an entry for a MariaDB container:nano ~/docker-project/docker-compose.yml
2. Update the
docker-compose.ymlfile with the provided MariaDB configuration.version: "3.9″
services:
nginx:
build: ./nginx/
ports:
- 80:80volumes:
- ./php_code/:/var/www/html/php:
build: ./php_code/
expose:
- 9000
volumes:
- ./php_code/:/var/www/html/db:
image: mariadb
volumes:
- mysql-data:/var/lib/mysql
environment:
MYSQL_ROOT_PASSWORD: mariadb
MYSQL_DATABASE: ecomdbvolumes:
mysql-data:Run the following command:
docker-compose up -d
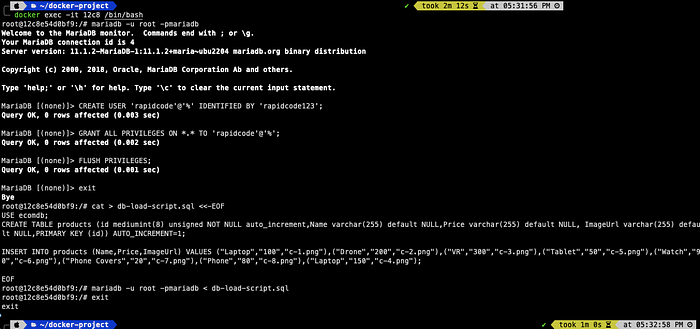
3. Create a CLI session inside the MariaDB container:
docker exec -it [db container id or name] /bin/sh
4. Access MariaDB as the root user:
mariadb -u root -pmariadb
5. Create a new user for the database:
CREATE USER ‘rapidcode’@'%’ IDENTIFIED BY "rapidcode123″;
6. Grant all privileges to the new user:
GRANT ALL PRIVILEGES ON *.* TO ‘rapidcode’@'%’;
FLUSH PRIVILEGES;7. Exit the MariaDB shell:
exit
8. Load product inventory information into the database:
cat > db-load-script.sql <<-EOF
USE ecomdb;
CREATE TABLE products (id mediumint(8) unsigned NOT NULL auto_increment,Name varchar(255) default NULL,Price varchar(255) default NULL, ImageUrl varchar(255) default NULL,PRIMARY KEY (id)) AUTO_INCREMENT=1;INSERT INTO products (Name,Price,ImageUrl) VALUES ("Laptop","100″,"c-1.png"),("Drone","200″,"c-2.png"),("VR","300″,"c-3.png"),("Tablet","50″,"c-5.png"),("Watch","90″,"c-6.png"),("Phone Covers","20″,"c-7.png"),("Phone","80″,"c-8.png"),("Laptop","150″,"c-4.png");
EOF
9. Run the SQL script:
mariadb -u root -pmariadb < db-load-script.sql
10. Exit the MariaDB container shell:
exit
11. Make sure that the
index.phpfile in your PHP code is properly configured with the username and password that we have created above to connect to the MariaDB database: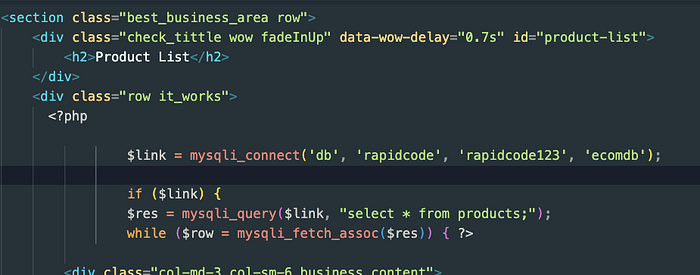
Check the URL again and refresh it. You should now see your PHP web application fetching data from the MariaDB database.

—
Nginx Reverse Proxy
How I hosted my web app on my server with a Free SSL certificate.
After getting my first cloud server, the natural first step was to build and host my website (or web app!) on it.
That got me into the rabbit hole of learning about proxies, reverse proxies, A records, SSL certificates, etc.
It took me a couple of hours to comb through dense computer networking and internet-routing blog posts, but I eventually figured it out.
Now, if you go to irtizahafiz.com or www.irtizahafiz.com, you will see a working version of my NextJS example app — coming to you straight from my Digital Ocean server!In this blog post, I plan on taking you through a step-by-step tutorial helping you achieve the same thing that I did, but hopefully without the 2–3 hours of learning that I went through.
What Will You Learn?
I don’t want to waste anyone’s precious time. So, take a look at the topics I will cover below, and read on if it’s of value to you.
- Connecting your domain to your server
- Installing and configuring Nginx
- Exposing your internal web app (NextJS, ReactJS, Python Flask, etc) to the public internet
- Proxies and reverse proxies
- Creating SSL certificates for your domain
- Serving your website through secured HTTPS
If you are still interested, let’s get started.
Connect Your Domain to Your Server
The first step requires the least number of steps.
You need 2 things:
- Access to your Domain Dashboard (GoDaddy, Namecheap, etc)
- The public IP address of your server machine
Then, you go to the DNS management in your Domain Dashboard and add an “A” record with the value set to your server’s IP address.
It will take you 2 minutes to do this!
Running Your Web App of Choice
Now, onto the more exciting part.
It doesn’t matter what framework you use to run your web app locally — NextJS, ReactJS, Python Flask, Python Django, etc.
In all cases, you do the same thing. You run your web app on a given port in your machine.
In my case, that was running a NextJS app in port 3000.
You can do something as simple as:
npm run start
And you will have your web app running on your local machine. You can access it from within your WiFi network, but not from outside.
Installing Nginx Web Server
To serve your web app to public internet users, you need to use a web server. Then, you have to proxy the incoming web server request to your locally running app.
Let me explain.
First, let’s install Nginx on your server.
sudo apt update
sudo apt install nginxOnce successfully installed, you will find the relevant Nginx config files below:
/etc/nginx
With a working Nginx, any request coming to your server’s port 80 (by default) will be served by a static Nginx HTML page.
Next, we will replace this static page with your locally running web app.
Configuring Nginx
The default Nginx configuration is housed in the directory:
/etc/nginx/sites-available/default
As the first step, we will delete the default config, and create our custom config in a file called myserver.config.
Here’s the sequence of commands:
sudo unlink /etc/nginx/sites-available/default
rm /etc/nginx/sites-enabled/default
cd /etc/nginx/sites-available
touch myserver.configWhat are we doing?
- Unlinking the default config
- Deleting the mirrored version of the default config
- Creating our custom config file called myserver (will be populated soon)
Proxying Requests to Your Web App
Then, write the following Nginx config inside your newly created myserver.config file.
server{
server_name irtizahafiz.com;
location / {
proxy_set_header Host $host;
proxy_pass http://127.0.0.1:3000;
}
}This will do the following:
- Accepts requests coming to the domain irtizahafiz.com
- Proxies the request to the machine’s port 3000 (whatever port your web app is running on)
- Returns to the user response from your web app
Finally, Restart Nginx
Once all the steps are complete, restart Nginx:
sudo systemctl restart nginx
Now, any HTTP request coming to irtizahafiz.com will be routed and served by your locally running web application.Works…But Not Through HTTPS
If you have been following closely, you will see that we haven’t talked about the SSL certificate yet.
Also, if you go to your linked website — irtizahafiz.com in my case — you will see that it’s being served through HTTP, not HTTPS.
Some browsers, such as Safari, might even refuse to show you the web page because of security concerns.
Let’s fix that.
Getting A Free SSL Certificate
I was always under the impression that you have to pay for SSL certificates.
It didn’t help that all the domain management websites — GoDaddy, Namecheap — even try to sell you SSL certificates for $8/month, $10/month, etc.
When you are hosting your web app on your machine, you can instead get SSL certificates for FREE!
There’s a brilliantly written blog post by Certbot that you can follow to get a free automatically renewing SSL certificate for your domain.
Please check out the linked blog post, but to make it easy to follow along, I will list the sequence of bash commands below:
sudo snap install - classic certbot
sudo ln -s /snap/bin/certbot /usr/bin/certbot
sudo certbot - nginxCertbot will make some changes to your Nginx config file — in our tutorial the myserver.config file that we created.
It essentially creates some private keys, stores them in your Keychain, and then links them to your domain.
Now, your traffic will be served from a secured port 443 rather than the default port 80.
Closing Thoughts
Overall, the above configuration ensures that all traffic to irtizahafiz.com is redirected to HTTPS and proxied to a backend server running on port 3000.
I hope this guide was helpful.
If you have more questions, drop a comment below. If you found this valuable, give me a follow and subscribe to my newsletter.
—
How to redirect to multi pages by header
Abstract
When developing a project, sometimes we need to migrate our product to a new platform for many reasons such as reducing infrastructure costs, increasing system availability,… And when migrating, we also need to ensure that the current system and the system under development need to run same time. If just adding a domain to the new system for development is probably the solution that everyone chooses. However, this article will demonstrate how to setup nginx so that you can use the same domain but can still request to the new system.
Environment
For easy deployment I will use docker
Below is the nginx.conf file
worker_processes 1;
events { worker_connections 1024; }
http {
 keepalive_timeout 65;
 map $http_host $webapp {
    default             "default_webapp";
    "web1.example.com"  "webapp1";
    "web2.example.com"  "webapp2";
 }
server {
listen 80;
server_name web1.example.com;
location / {
# Proxy pass based on the value of $webapp
   proxy_pass http://$webapp;
}
}
upstream default_webapp {
   server 127.0.0.1:8080;  # Default web application server
}
upstream webapp1 {
   server 127.0.0.1:8081;  # Web application 1 server
}
upstream webapp2 {
   server 127.0.0.1:8082;  # Web application 2 server
}
}
In this example:
- The
mapdirective is used to map between the values of the$http_hostvariable (i.e., the value of theHostheader in the HTTP request) and the$webappvariable.- In each server block,
proxy_passis used to proxy the request to the corresponding upstream server based on the value of the$webappvariable.With this configuration, Nginx will serve the web page from the corresponding backend server (default, webapp1, or webapp2) based on the
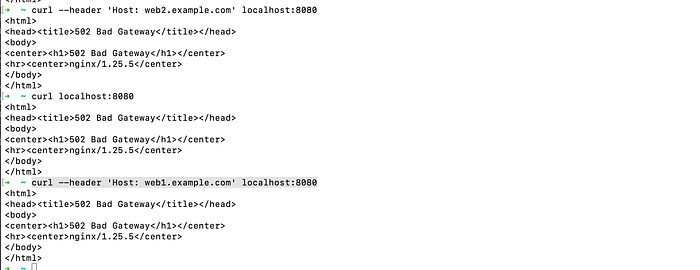
Hostheader in the HTTP request.Even though there are no servers deployed, the request will definitely return 502 bad gateway error. However, based on nginx’s log, we can still check whether nginx is working as expected or not.
Docker-Compose
version: ’3′
services:
nginx:
image: nginx:latest
ports:
- "8080:80″
volumes:
- ./nginx.conf:/etc/nginx/nginx.conf
restart: alwaysRun
docker-compose up -d
Testing
Command:
curl --header ‘Host: web1.example.com’ localhost:8080
requests

nginx logs
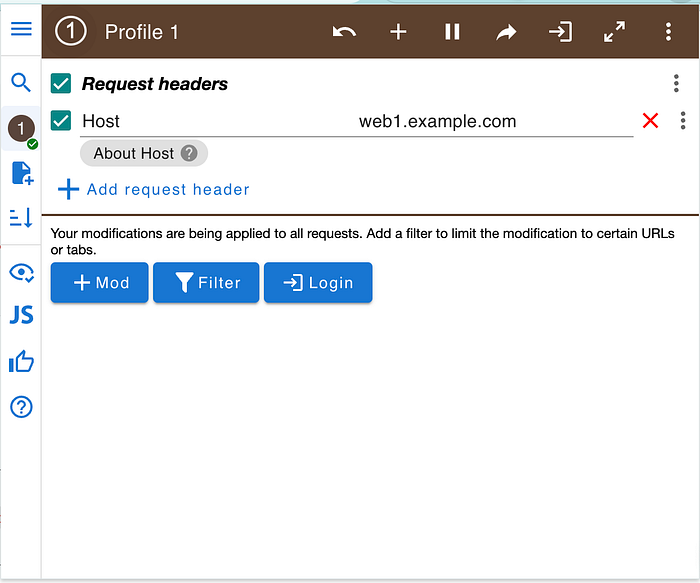
How to custom header on browser
In Google Chrome, you can’t directly modify the request headers for regular browsing sessions without using extensions. I will use ModHeader to do that
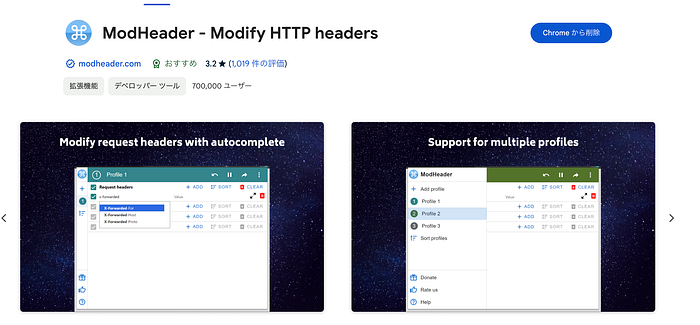
ModHeader extention